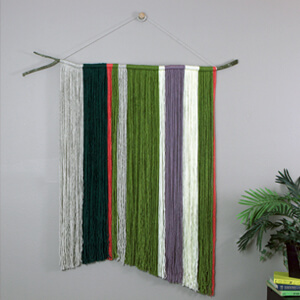
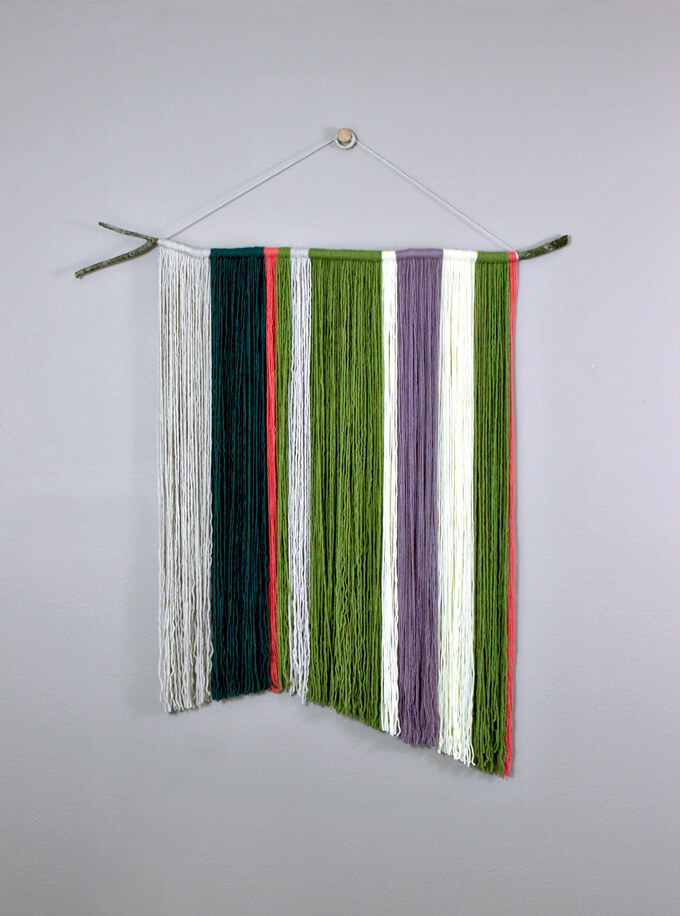
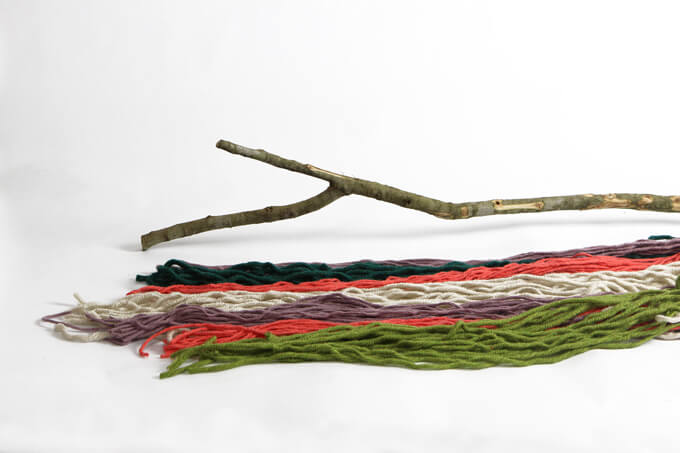
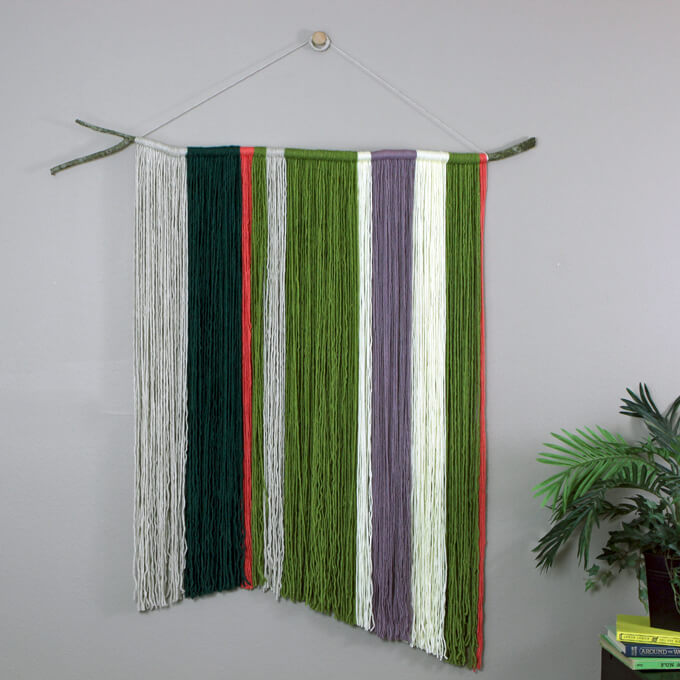
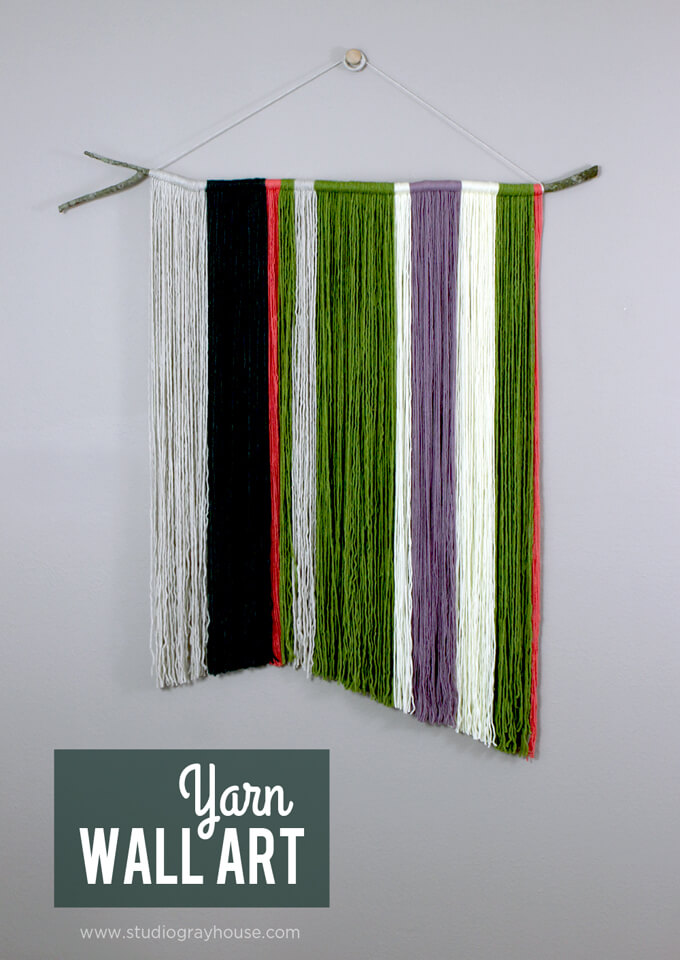
Check out how we made a colorful branch & yarn wall hanging for our guest bedroom.
One room that we haven’t shared yet on the blog is our guest room. If I am being honest that is because the design of that room is still all over the place. I found a new colorful duvet cover that I love but we just haven’t been able to give much time and attention to this room. There is a lot of mixing and matching of furniture going on and not in a good way, more of an any left over piece that didn’t have anywhere else to go kind of way.
A branch and yarn wall hanging was the perfect solution. This project was really easy and fun to make. We put it together in just a few hours and love the results. Today we are sharing how we made our branch and yarn wall hanging.
SUPPLIES
MATERIALS
Yarn in multiple colors
Branch
Metal loop
Cabinet pull knob
Double end threaded screw
TOOLS
Scrap Wood
Clamps
Scissors
HOW WE MADE OUR Yarn Wall Hanging
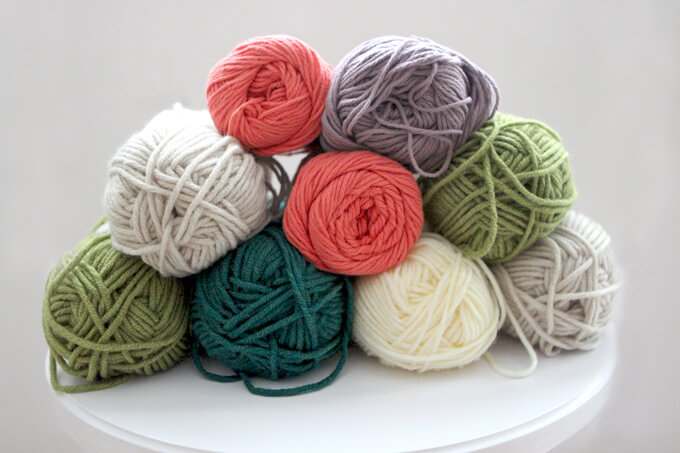
1. I loved picking out all the colors of yarn I wanted to incorporate into the wall hanging. I choose a few greens that matched the duvet cover in the room and then selected contrasting colors and neutral colors for balance.
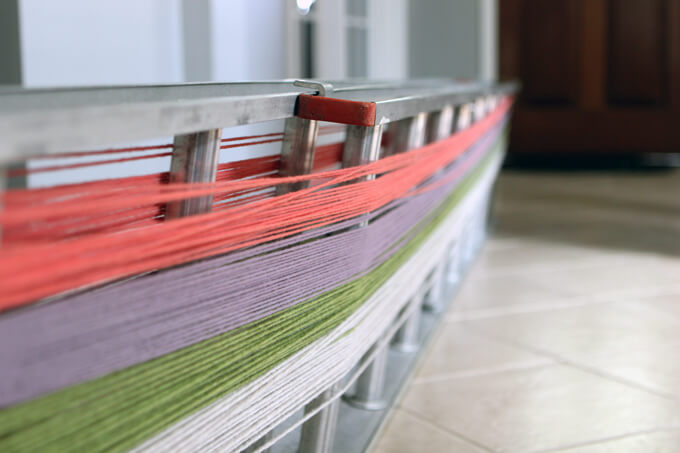
2. We measured how high we wanted the yarn wall hanging to be on the wall and then doubled the height to determine the length the yarn needed to be cut. For ours we wanted it pretty large so we cut all our yarn into individual 8 1/2 ft. pieces.
To do this quickly we wrapped all the yarn around a ladder (set to 8 1/2 feet). Then we cut all the yarn at once at both ends. We did this for each color of yarn.
3. After we cut all the yarn, we went on the search for a branch. We got our branch off a tree in our front yard. Don’t worry, it needed to be trimmed anyway. Win, Win. Before we used it we cut it to the length we wanted and then cut off all the knots on the branch.
We wanted a consistent surface and it didn’t really matter what most of the middle of the branch looked like since we were going to cover it up with yarn anyway.
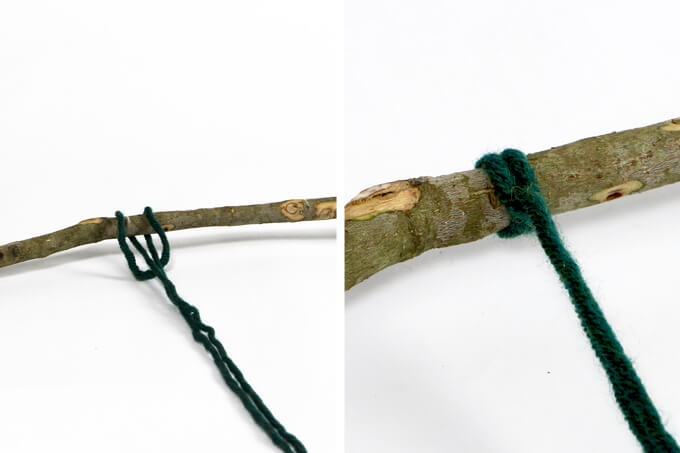
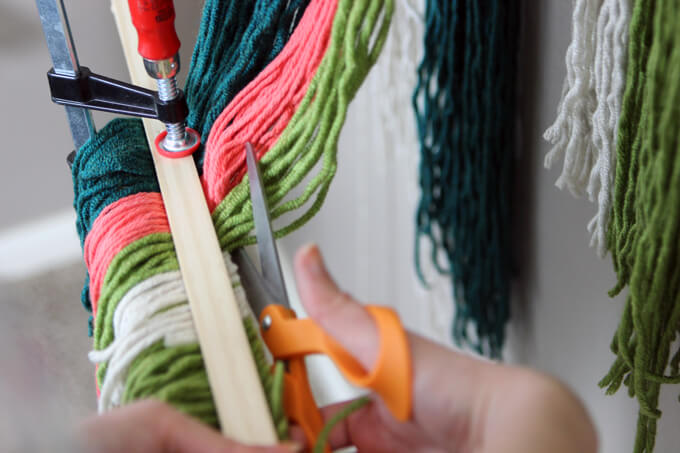
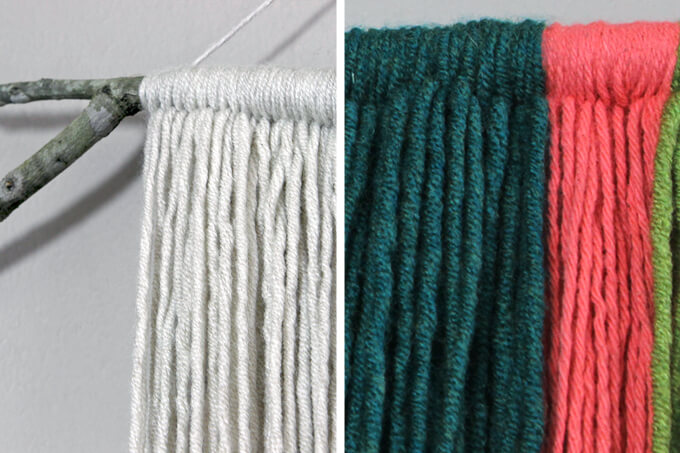
4. To attach the yarn to the branch, we folded a piece in half and then ran the folded end under the branch. After laying the fold over the top of the branch, we pulled the two loose ends through the loop.
This created a simple knot that is often called a Lark’s Head Knot. We repeated this step with each strand of yarn varying the colors to create our desired pattern.
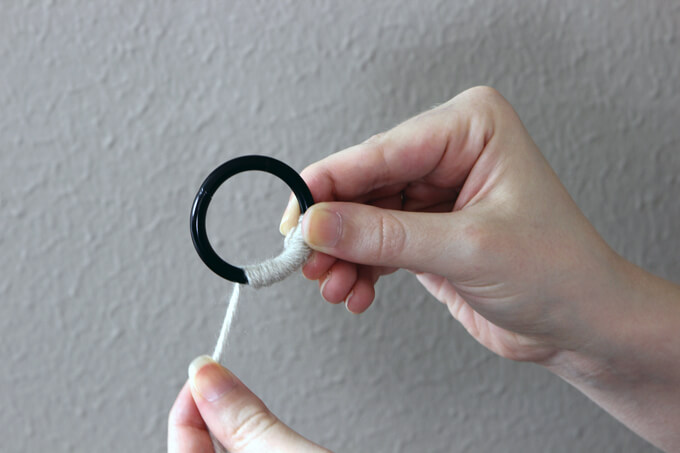
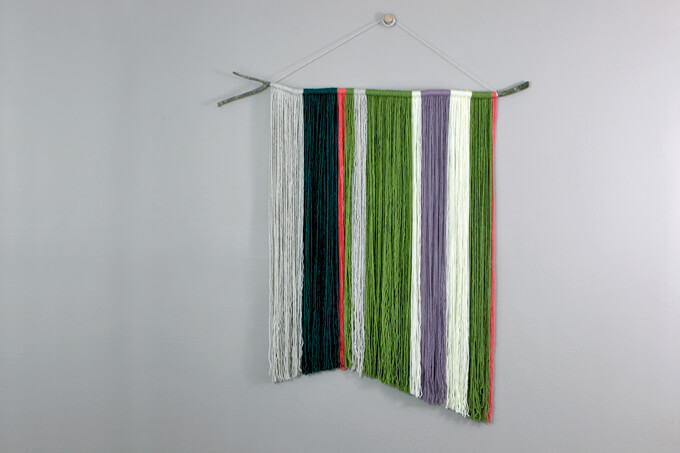
5. To hang the branch we tied it to a metal loop that is often used to hang curtains. The color of the metal ring was too dark for the look we were going for so we wrapped it with an extra piece of yarn to make it blend in and be less noticeable.
6. We hung the metal ring on a cabinet pull knob. Instead of using the screw that came with the knob that is intended go through the face of cabinets, we used a double end threaded screw.
This allowed us to screw into the knob and into the wall making it secure enough to hold the wall hanging.
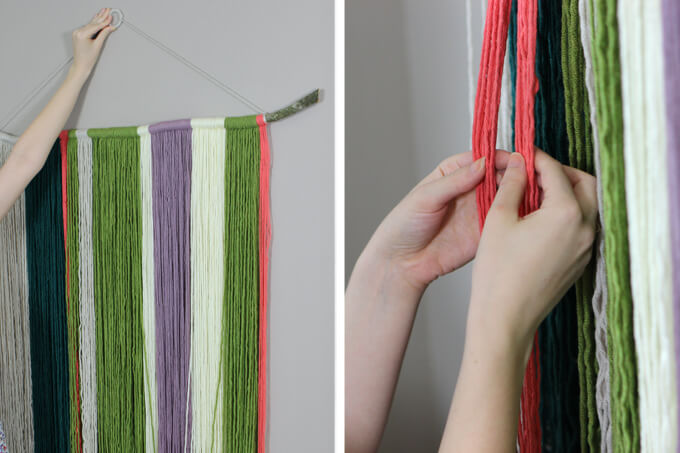
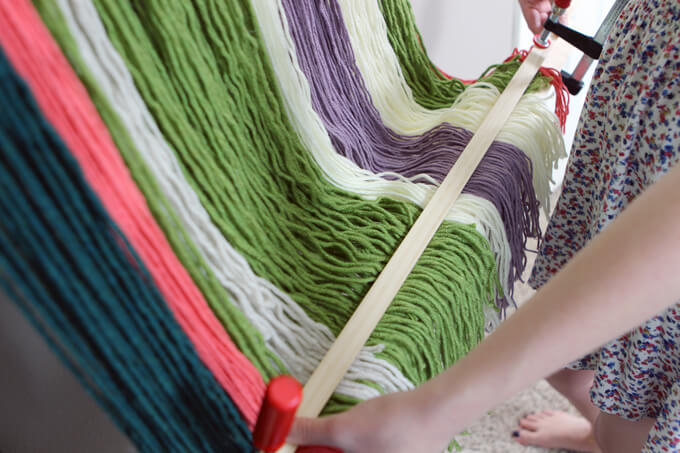
7. After we hung the branch and yarn wall hanging, we straightened the yarn to make sure all the strands were in the right place.
8. To provide a straightedge to cut the yarn we clamped the yarn where we wanted to cut between two boards.
9. Finally, we cut the yarn against the board. This shaped the bottom of the yarn and made it look even.
The branch and yarn wall hanging brings cheer, color and whimsy to our guest room. I love how it brightens up a blank wall. You know what else I adore about this project? How low maintenance it was to make. I did the majority of it while sitting on the couch watching TV at night.
From picking out the colors of yarn, to drawing up a pattern, hunting for the perfect branch and hanging up the finished product, this project was extremely fun to create.
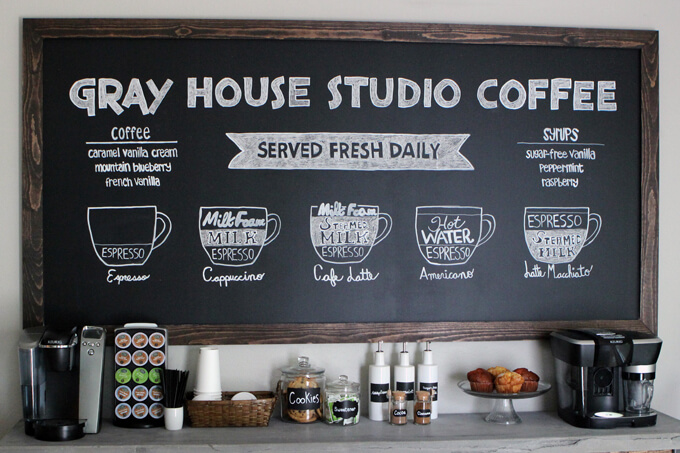
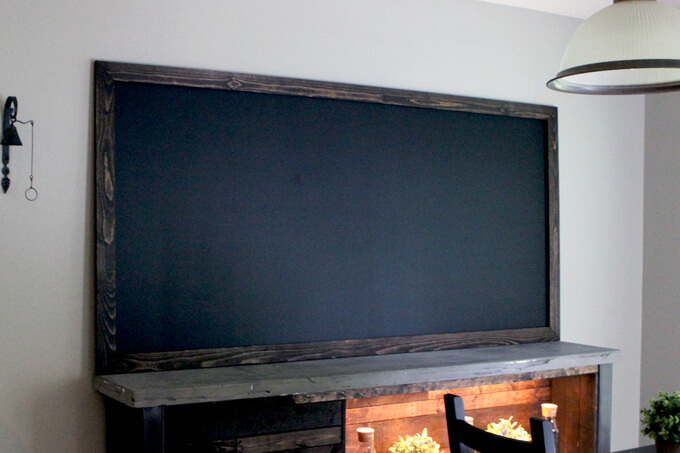
For this simple and versatile DIY decor project tutorial we will show how we made a custom sized framed chalkboard to hang above our coffee bar.
I think it is safe to say large chalkboards have long since moved from being a staple item in classrooms to being a staple item in coffee shops. When looking for inspiration for our coffee bar, we looked at the interior design of lots of coffee shops (both in photos and in person). One of the common design choices we noticed is to utilize large chalkboards to display menus or art.
Having large chalkboards in the home is now becoming more popular as well to keep track of schedules or chores, weekly menu planning or allowing kids to conveniently express their creativity by having a place to draw on the wall (without actually drawing on the wall).
I love this idea because I always had a chalkboard hanging on my wall in my room when I was growing up. I loved to force er… I mean ask my little brother and his friends to play school with me. I was always the teacher of course.
We knew a chalkboard was a necessity for our breakfast nook to capture an authentic coffee bar feel. We just had to decide what form our chalkboard would take. When it came down to it we couldn’t make the commitment to painting the entire wall or even part of the wall with chalkboard paint since we just painted it gray. All the chalkboards we found to purchase were either not big enough or way too expensive.
We decided to create our own 7 foot framed chalkboard. This was the best solution for us because we could make it the exact length of the coffee bar, it would fill up the large wall and we could customize the frame to match the wood on the bar.
FYI: This post contains a few affiliate links to products we used to make this project. Gray House Studio does receive commissions for sales from these links but at no extra cost to you. We appreciate you supporting this site. Read our privacy and disclosure policy. You can also easily shop our recommended products here.
STEPS
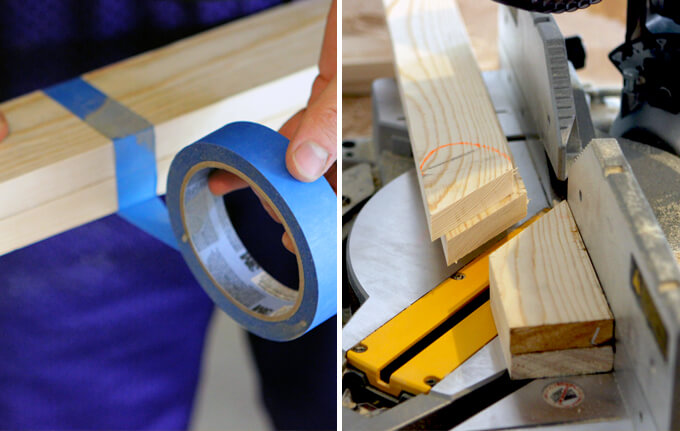
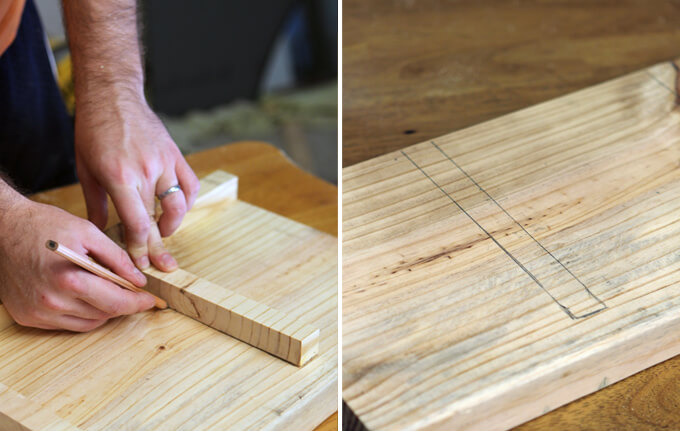
1. The first step was to make our frame. We used painters tape to tape together two of the pine boards that would be on the opposite sides of the frame together.
We taped the two longer horizontal pieces together and then taped the two shorter vertical pieces together.
This allowed us to make one cut through two boards and guaranteed that the matching sides of the frame would be the exact same size. We made our cuts with our miter saw.
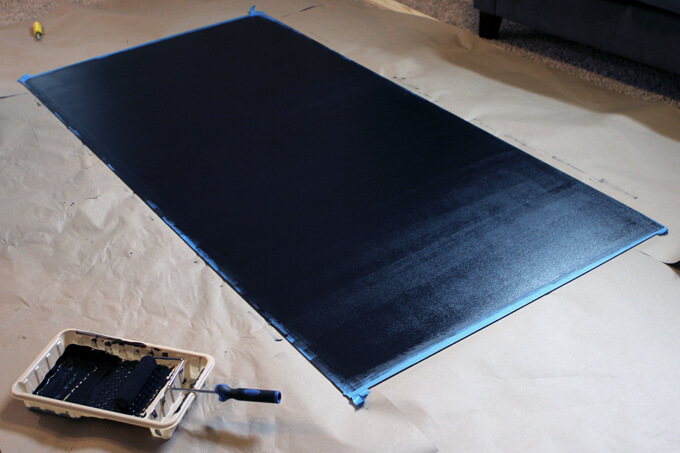
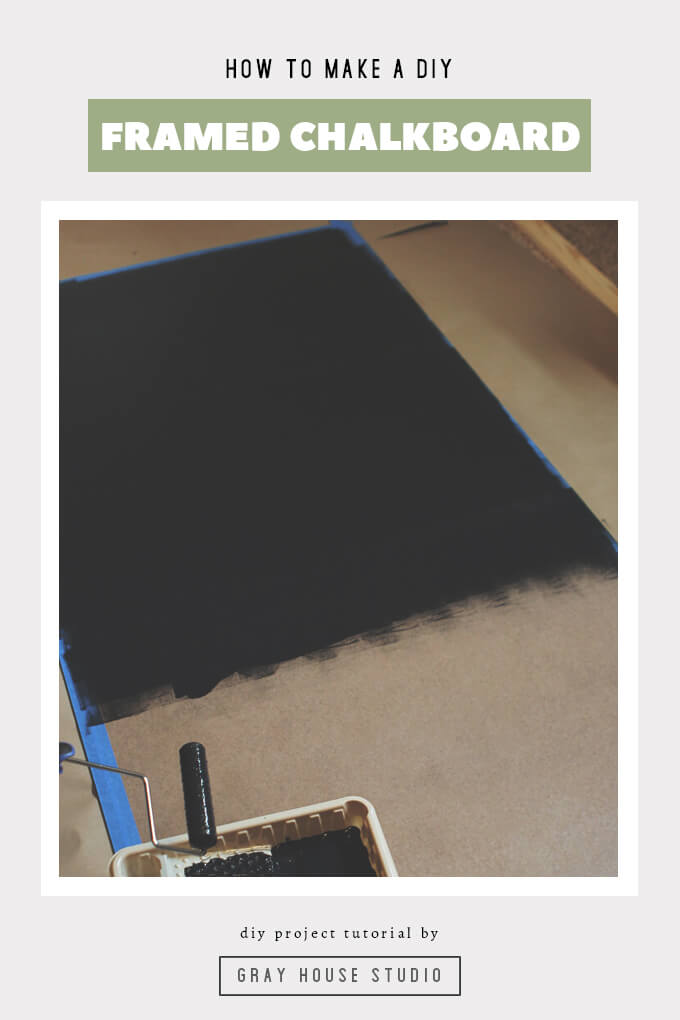
After we cut the four pieces for the frame, we stained the boards with a Kona stain to match the wood on the coffee bar.
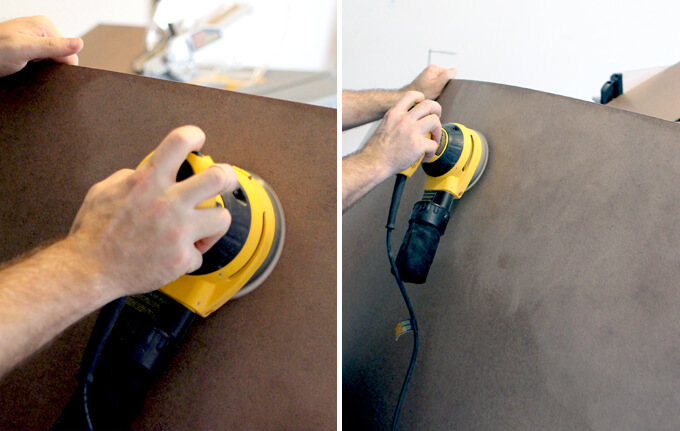
We chose to use this material because it was really cheap (less than $10 for a 4ft. x 8ft. piece) and it has a smooth finish.
However, with no prep the chalkboard paint would most likely flake off the board. To prevent this, we sanded the entire surface with 120 grit orbit sand paper on our orbital sander.
It provides enough tooth for the paint to have something to grab but it does not make it too rough where the paint surface would look scratchy or bumpy.
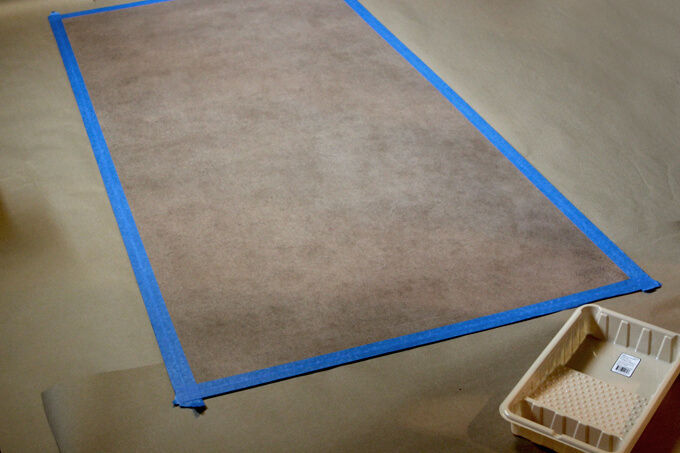
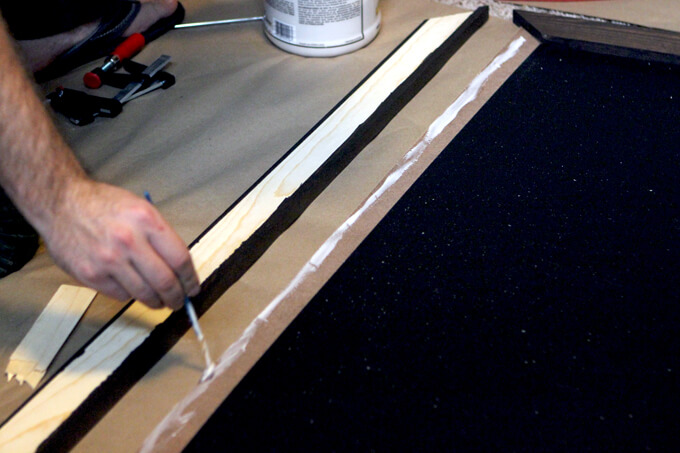
3. We planned to glue the frame to the chalkboard with wood glue so we taped off an area of the board with painters tape before we applied the paint.
We knew the glue wouldn’t adhere well to the chalkboard paint so we needed to make sure we still had an area of the original board to attach the frame.
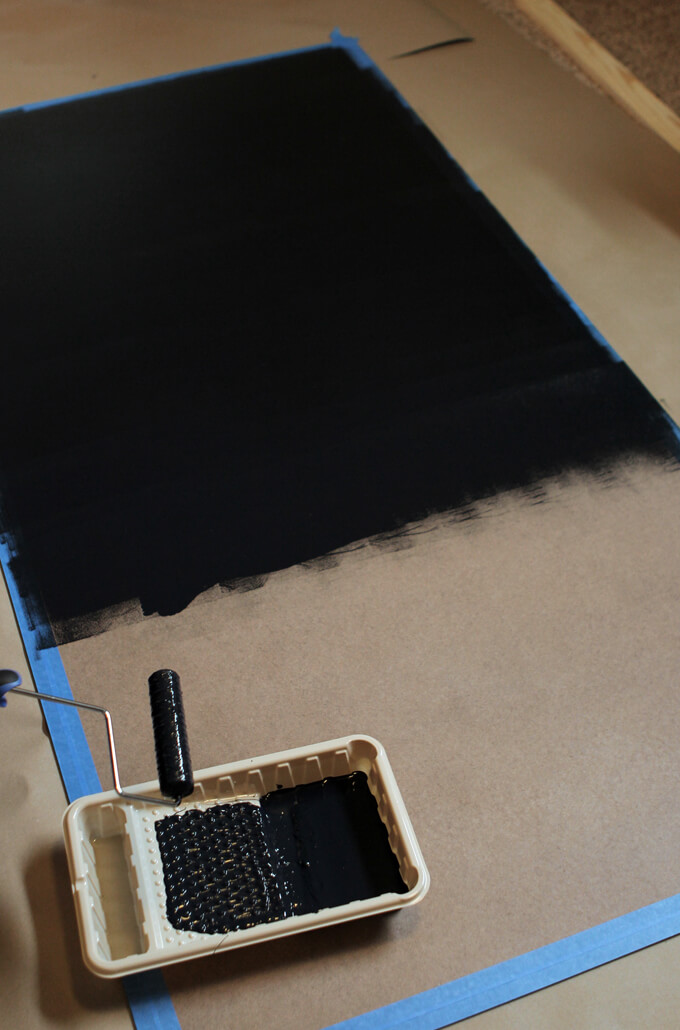
It worked really well to create a smooth finish. It took us two coats to ensure that all areas where completely and evenly covered.
5. After we finished painting the board, we let it dry for awhile.
6. When it came time to attach the pieces of the frame to the board, we pulled off the tape and applied wood glue to the unpainted area of the board.
To avoid applying too much glue and having the glue squeeze out from under the frame onto the chalkboard surface, we applied the glue sparingly with a small paintbrush.
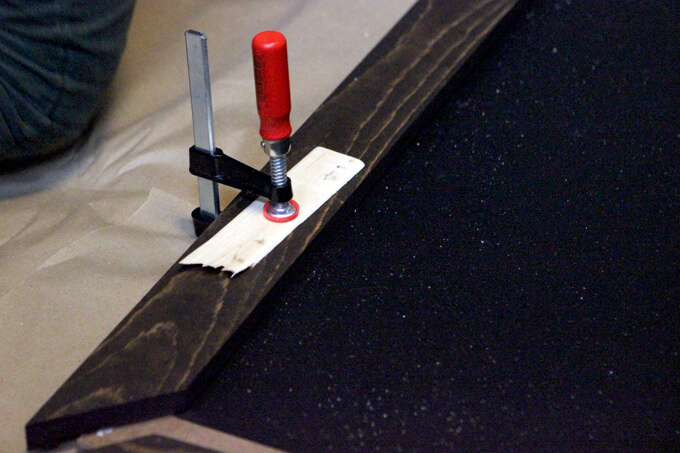
7. After the glue was applied to one side, we used small clamps to hold the piece of the frame to the chalkboard while they dried.
The pressure of the clamp can mess up the finish of the wood so as always we place a piece of scrap wood between the clamp and the frame.
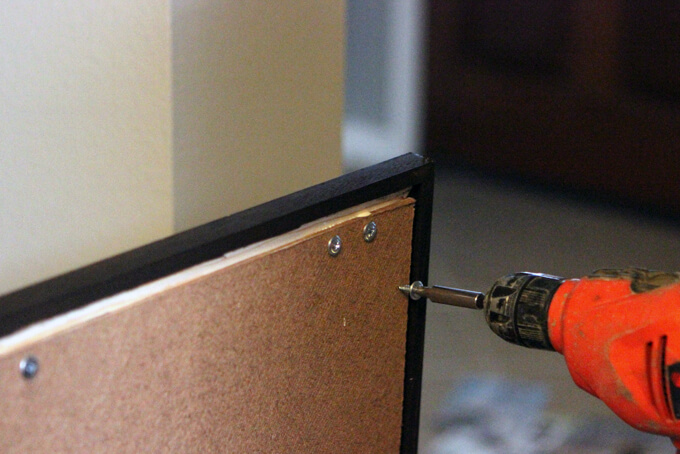
8. Once the frame was clamped to the board we attached the pieces of the frame together and the frame to the board with our drill and screws.
This provided extra strength to the bond and made sure everything was nice and secure.
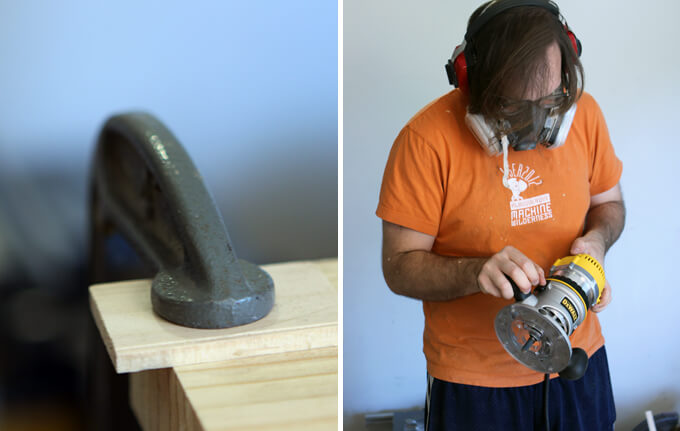
9. After we completed our framed chalkboard we added D-Ring hangers to the back and hung it above our coffee bar.
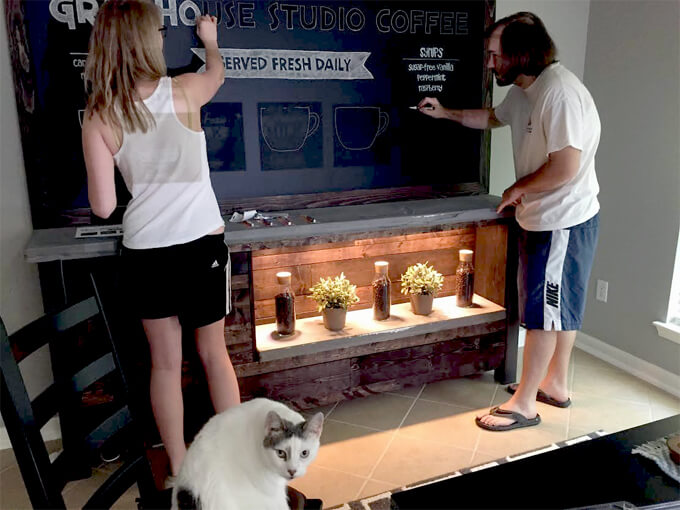
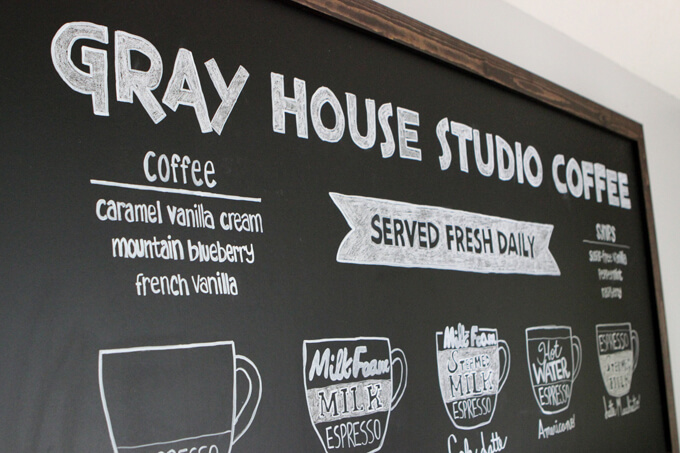
10. I designed our chalkboard art in PhotoShop first. I have pretty good handwriting but it was going to be nearly impossible with the scale of the chalkboard to make everything straight and scaled evenly.
I wanted the design to be personalized but also fairly minimal and clean. We worked in some common coffee shop phrases like “Served Fresh Daily”.
But I am thinking about adding our additional slogan, “At Gray House Studio Coffee, it’s not made until you make it yourself”. I printed out a copy of our design as reference.
Then we used a projector to display the graphic we designed on the computer onto the chalkboard to trace. I would recommend doing this in a dark room or at night but since we were in a bit of a rush I did most of the tracing in the middle of the day with the sun shining through the windows so it was really hard to see what I was tracing.
If you are looking for graphics you can use on your home coffee bar chalkboard, Creative Market has a lot to choose from! They are my favorite source to buy fonts and graphics for my DIY framed chalkboard designs.
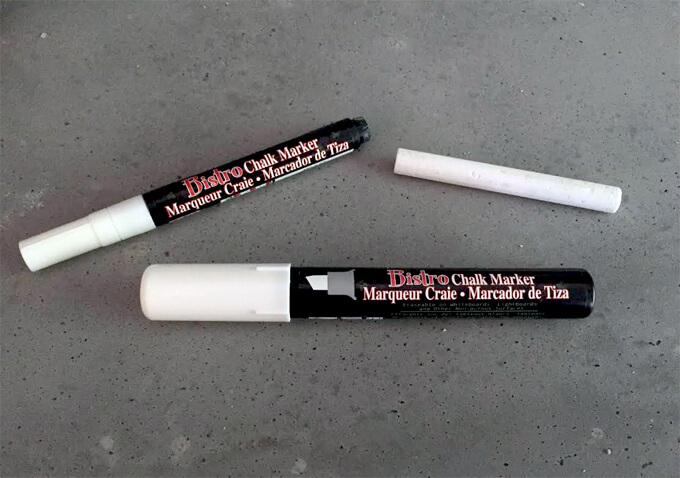
12. We used these Bistro chalk markers and they wrote nice and smooth. The fat tip one works really well for outlining because it makes for smooth, thick lines that you have quite a bit of control over.
I used the thin one for smaller details and smaller text where I wanted to trace over the words several times to make the letters thicker giving it a shaded appearance.
We used regular chalk to do all the shading. Regular chalk gives it gives it an authentic old fashioned chalkboard feel.
UPDATE: We left our chalkboard design for over two years and the chalk marker was pretty much impossible to get off. We had to eventually repaint a new coat of chalkboard paint over it.
I am not sure if that is because the chalkboard markers are meant to be more permanent or because we left it on there too long but while they wrote nice and smooth, I didn’t want to have to repaint the chalkboard after every design.
So now when we create a new design for our DIY framed chalkboard we use Anti-Dust chalk and a pencil sharpener to sharpen the chalk to a point so it is easier to trace.
There is nothing wrong with the chalk markers. If you clean your board off regularly or are looking for more of a permanent solution that won’t wipe off easily when you brush up against it, chalk markers might be the way to go.
However, this is our preferred method now when we redesign our chalkboard because the chalk wipes off very easily but by sharpening the chalk you have more control over the smaller details.
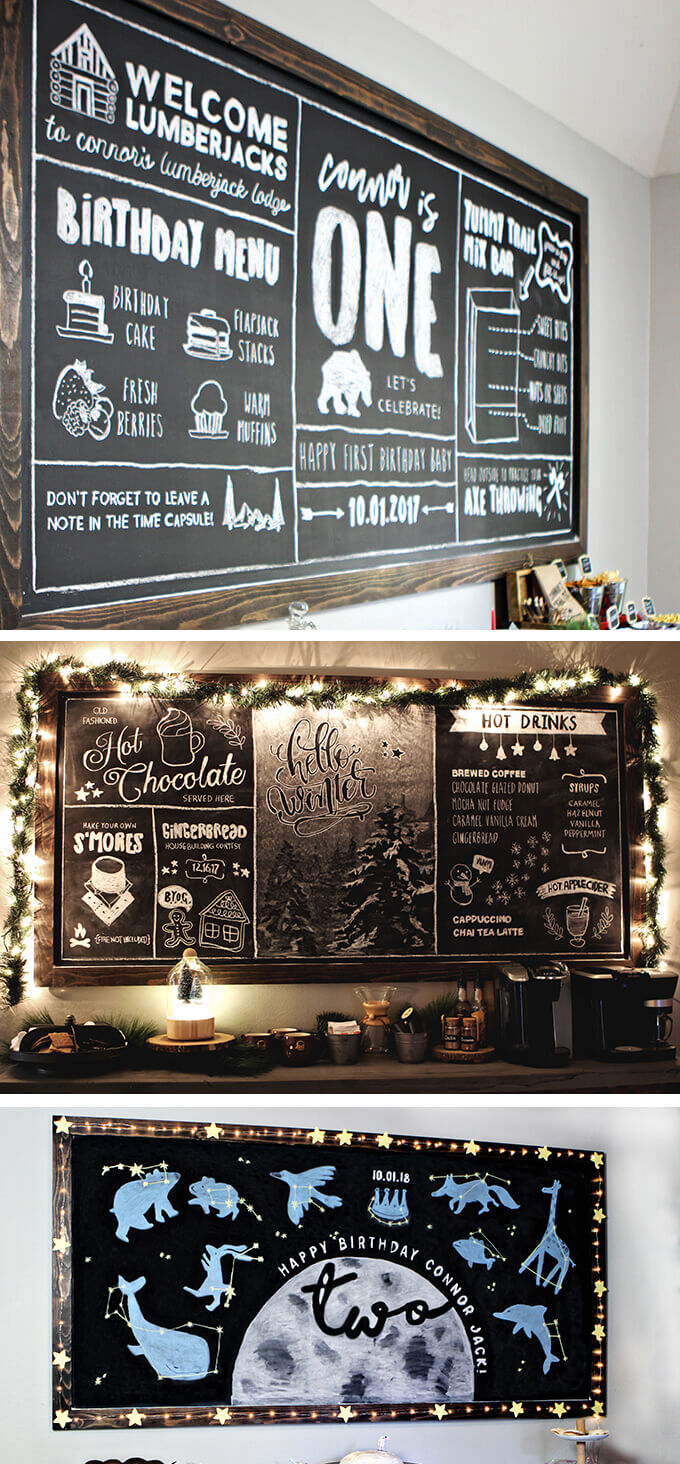
A large framed chalkboard is a fun element to incorporate into the home.
Whether they are intended to be functional, as art or both they bring personality to a room. They are especially perfect for home coffee bars to create that cozy and eclectic coffee bar feel.
We love creating our own framed chalkboard because it really allowed us to get creative both in the size and the appearance of the chalkboard. Having the framed chalkboard span the entire wall of our breakfast nook really catches our guests attention and makes it one of our favorite spaces in our home.
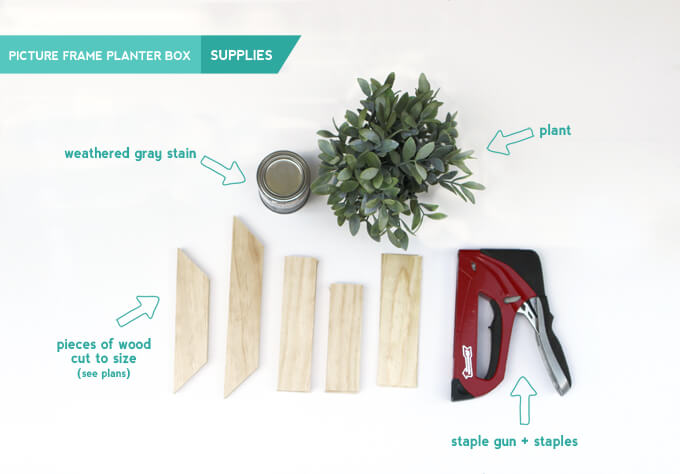
If you are looking for a special homemade gift or you just want to build one for your own home, we are sharing how we built picture frame planter boxes. Plus, free PDF of the plans to help you build!
Brent bought me the cutest picture frame planter last year for our anniversary. It had two tiny succulents that were adorable. And wouldn’t you know I killed one right off the bat.
I am just horrible at keeping plants alive, even little succulents. But I would like to make it known that the other one is still hanging in there, it just looks very lonely.
Anyway, I liked that framed planter so much that I wanted two more so I could hang three in our bathroom (the only place I can keep plants alive).
But I could not find the one he bought anywhere. However after looking at it closer we realized that it would be pretty easy and inexpensive to just build them ourselves.
Then it hit me, I enjoyed getting that picture frame planter box so much as a gift last year that I thought it would make for a perfect Mother’s Day gift. Plus, by making them ourselves we can customize them for each mom.
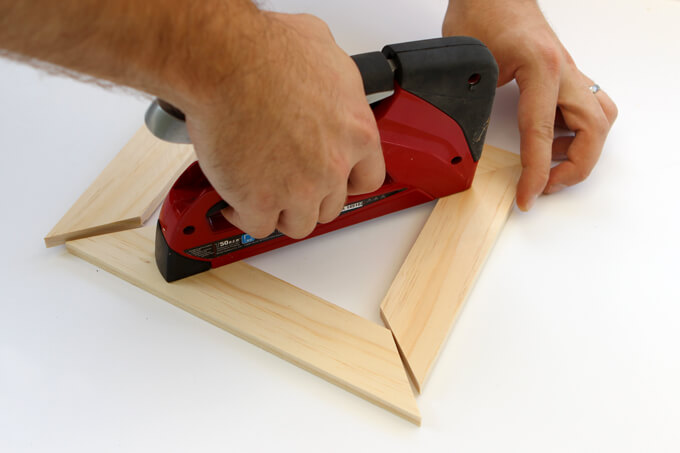
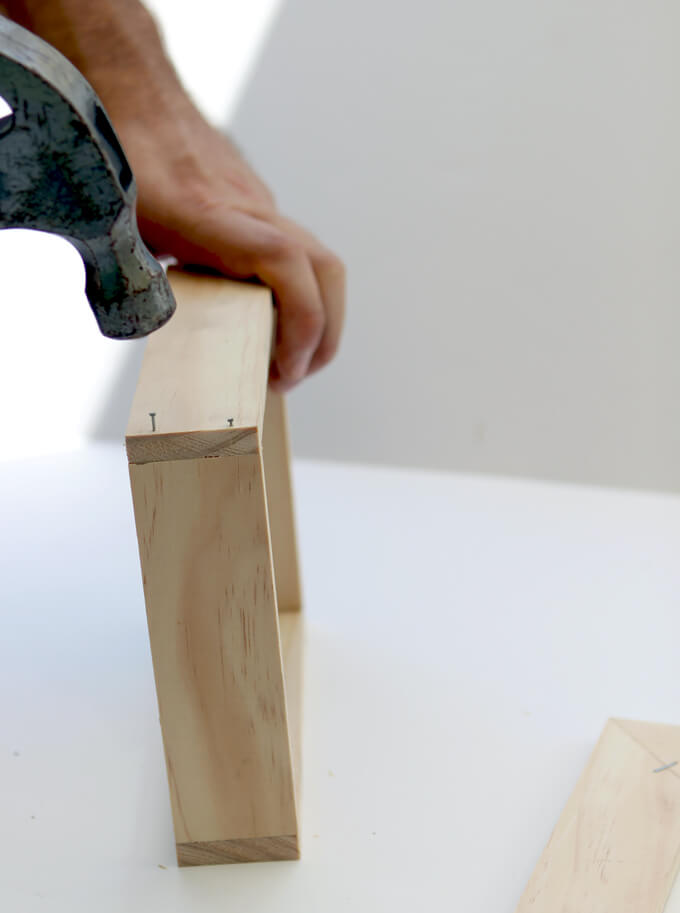
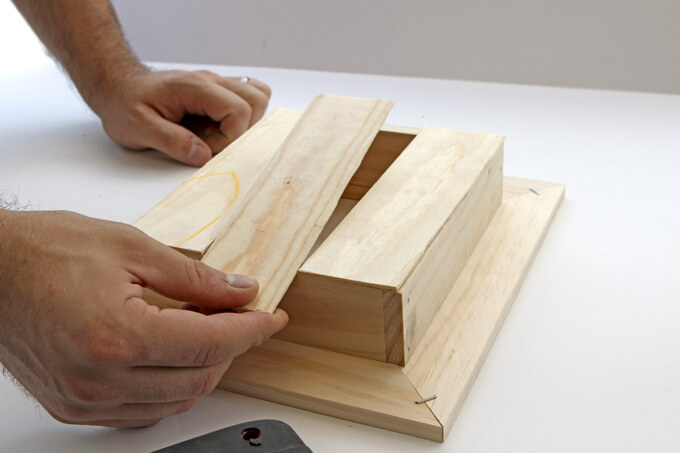
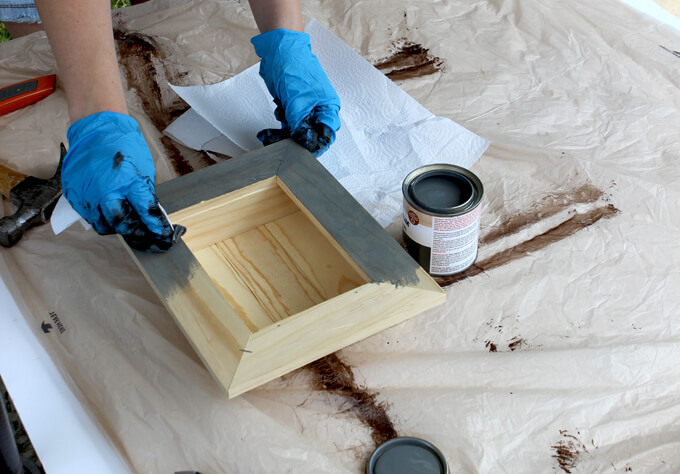
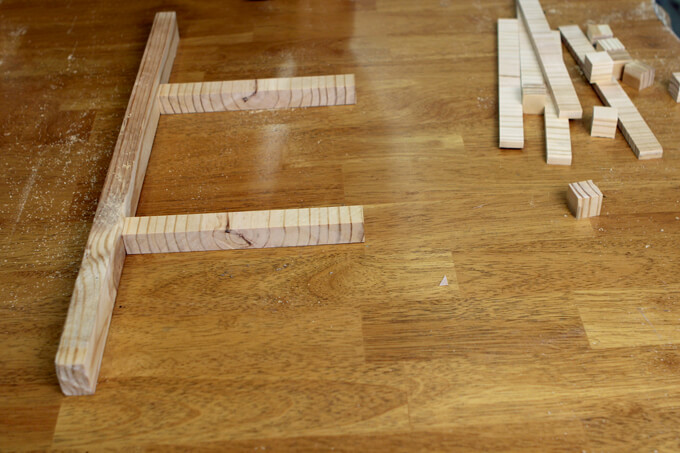
1. First we built the frame. We collected the four pieces of select pine we cut for the frame and pieced it together.
Then using the staple gun we stapled the pieces together at the joints to make the frame. We stapled each corner on both the front and back.
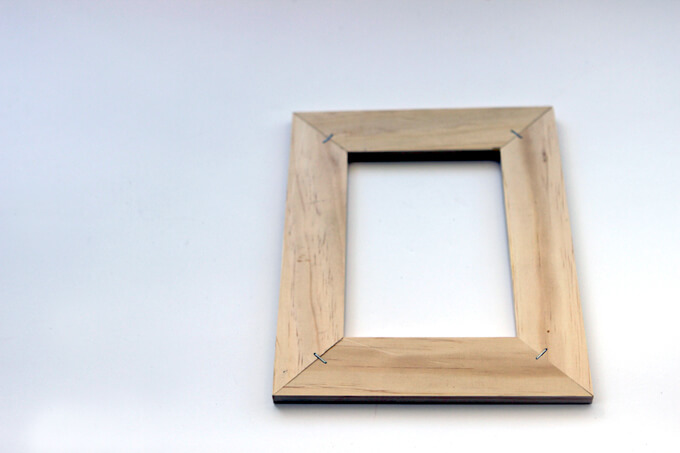
Here is the finished frame.
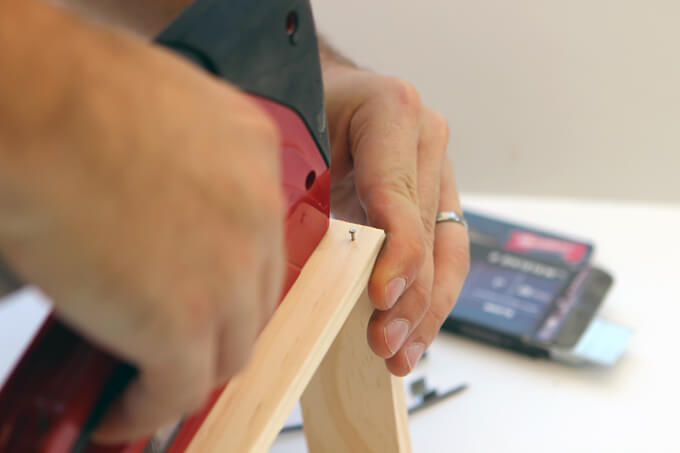
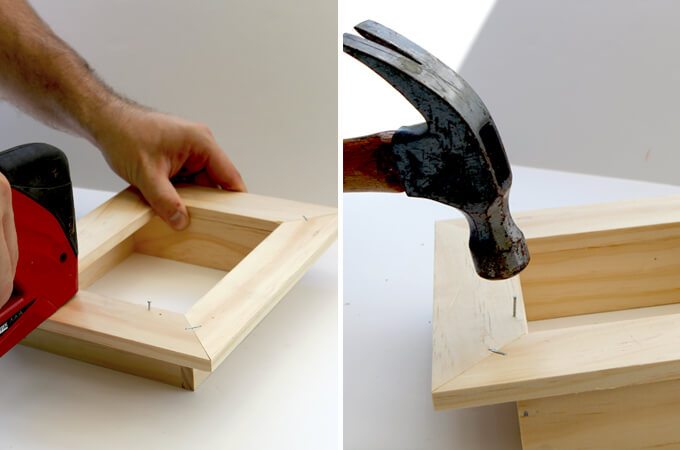
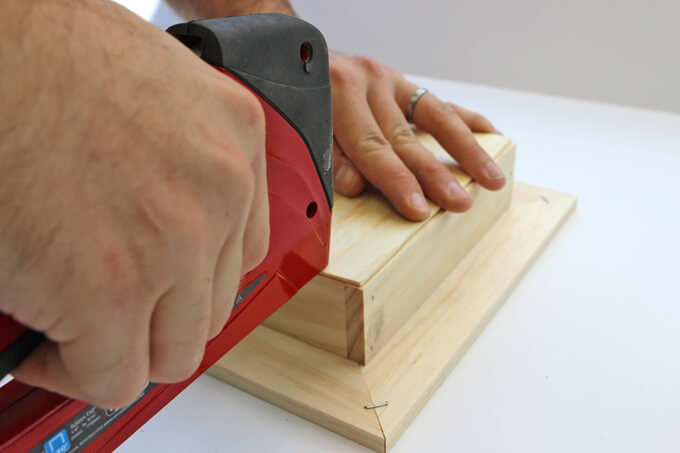
2. Next, we built the rim of the box. Our staple gun also uses finishing nails so we switched the staple gun over to finishing nails and nailed the sides of the box together.
3. Although the staple gun is easy and convenient, it is not always powerful enough to go all the way through the boards but that is not a problem.
We just came back and used a hammer hammered the nails into the boards. If you are not using a staple gun, you can just hammer finishing nails into the boards.
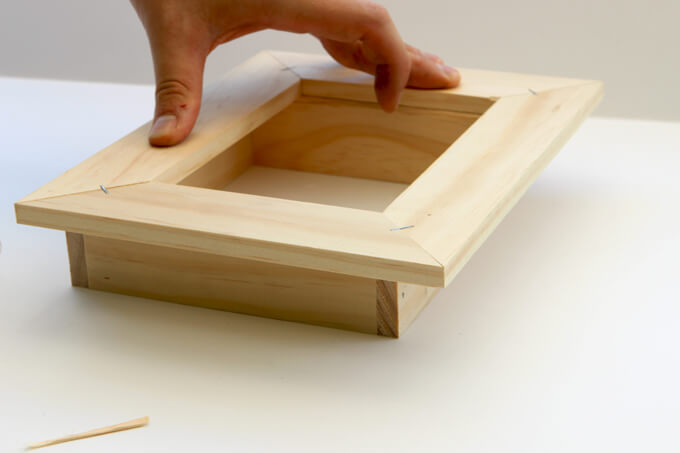
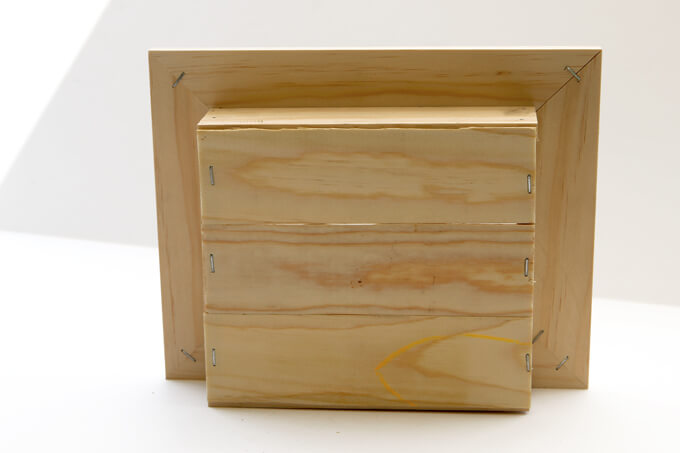
4. Once we assembled the rim of the box, we got ready to connect it to the frame. We lined up the bottom of the box with the bottom of the frame.
5. We nailed through the face of the frame into the rim of the box close to the inside of the frame.
This is what the assembled frame and rim of the box looks like.
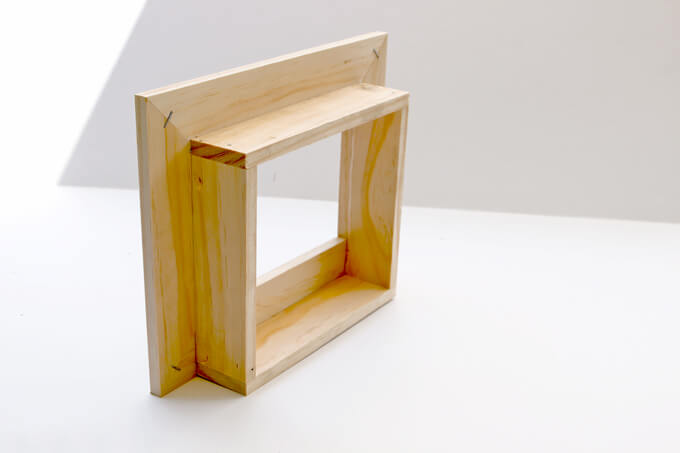
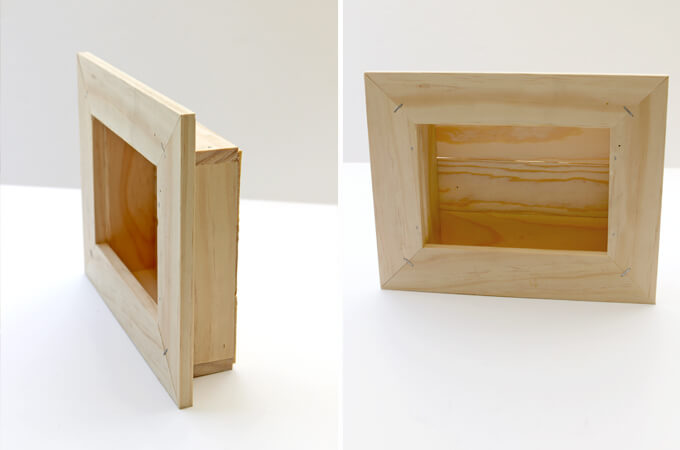
6. Next, we created the back of the box by attaching three thin slats of wood. You can also use one large piece as well.
7. We secured the back slats to the rim of the box with a staple gun.
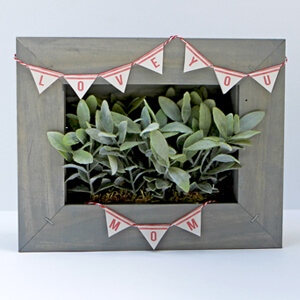
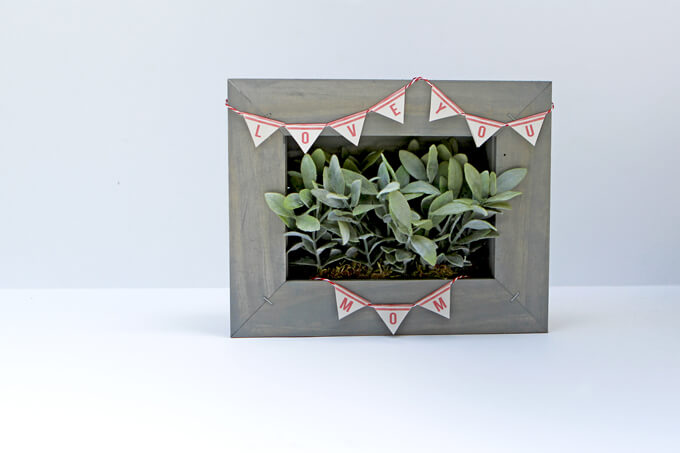
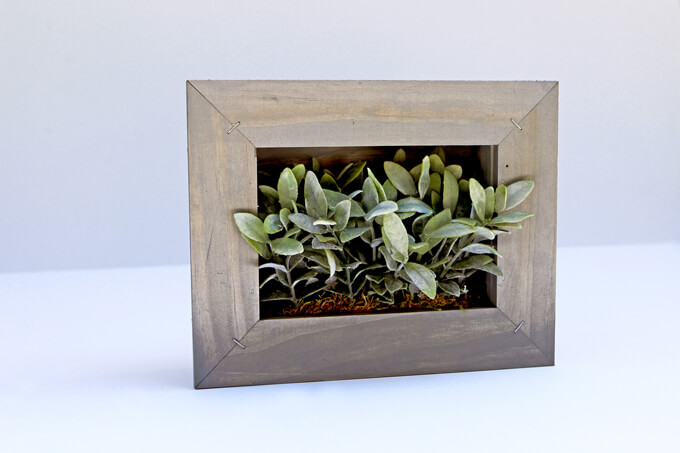
This is what the completed picture frame planter box looked like.
8. Next, we stained the box. We used a weathered gray stain but the possibilities are endless with what color stain or paint color you can choose depending on the style you are going for.
9. Once the planter box dried, we created our own simple artificial plant arrangement and added it the box. You can add your choice of live or artificial plants both would work great.
We love this planter because it is really versatile. You can set it on a table or attach picture frame hooks to the back and hang it up on a wall.
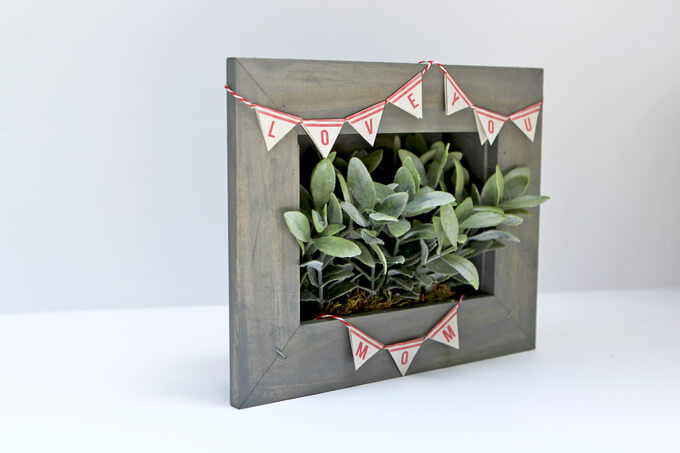
If you are keeping it for yourself, then you are done! But we took it a step further since we will be giving it as a Mother’s Day gift. We wanted to give it a festive touch so we made a little “Love You Mom” banner.
The picture frame planter box is a really simple project that only take about an hour to put together. It is completely customizable, versatile and chances are you have most of the supplies in your garage.
Whether you are making it for yourself or someone else, they make for an awesome decor piece.
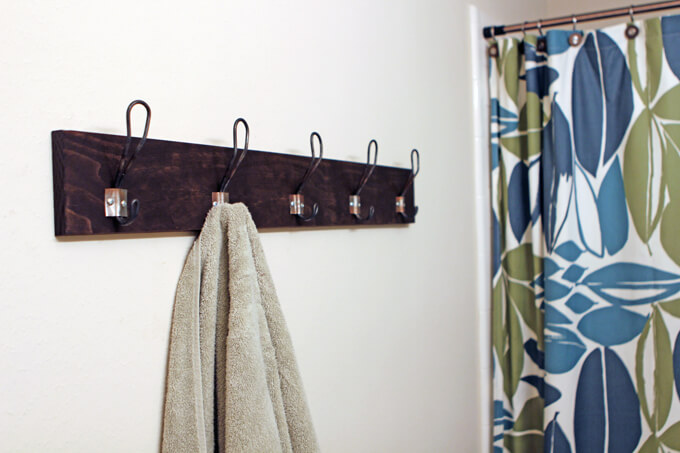
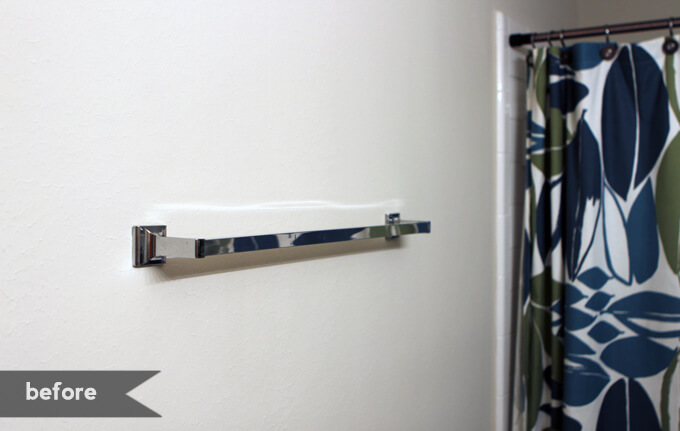
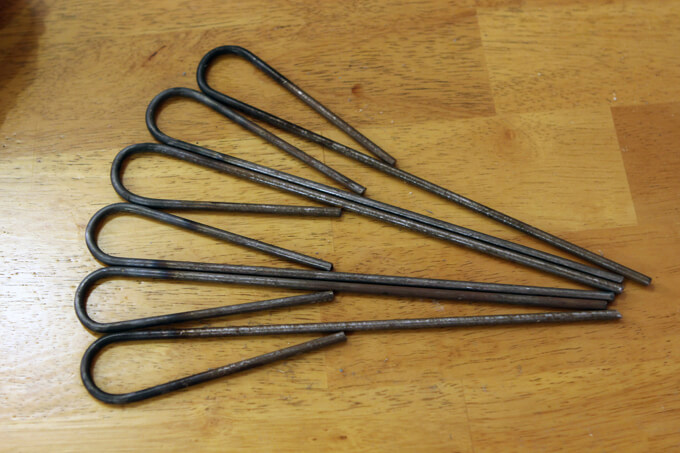
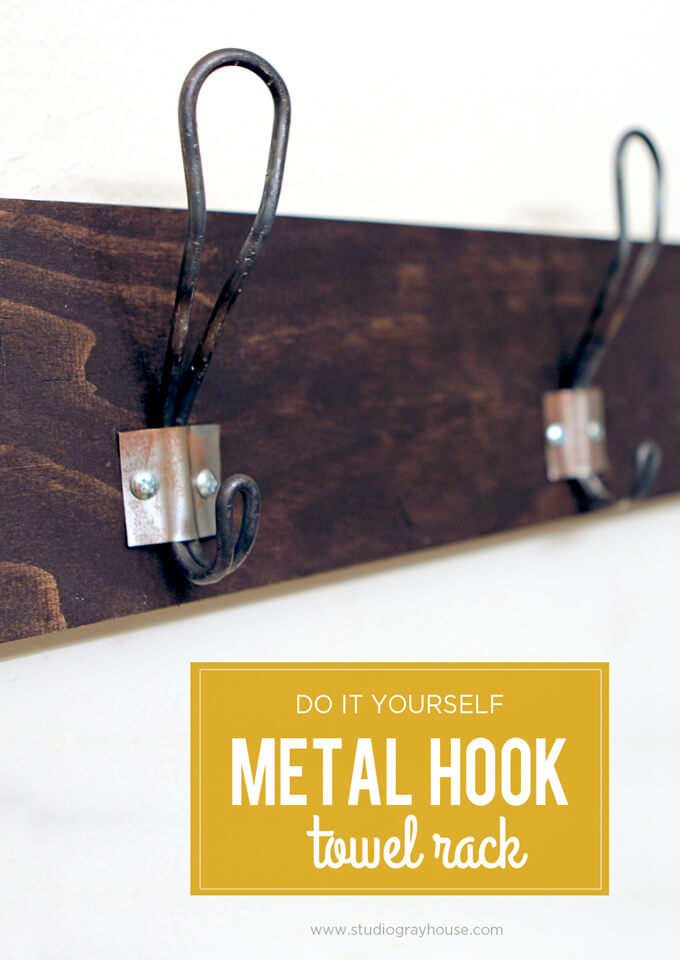
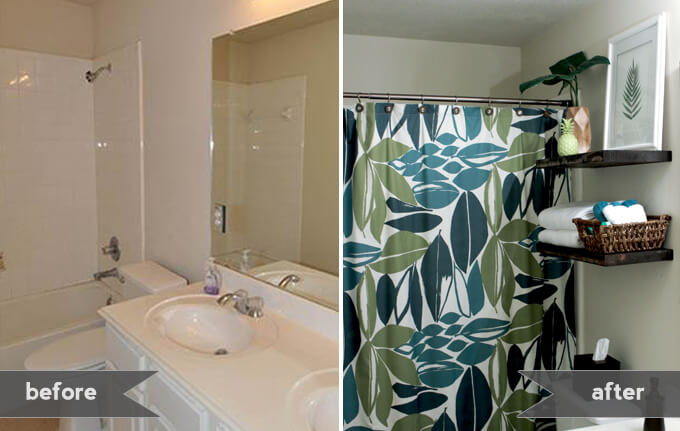
Our latest DIY project for our guest bathroom was to make a DIY metal hook towel rack by creating our own metal hooks.
Saturday, Brent and I worked on building the last small project in our guest bathroom, a DIY metal hook towel rack. We wanted to replace the generic silver towel bar that was currently in the bathroom with one that has more character and charm and matches our new floating shelves we built and our mirror frames.
We went full DIY on this project down to creating the hooks ourselves by bending metal rods. This was our first time doing anything of the blacksmith nature but we really wanted to have complete control over the look of the hooks. It took a few trial runs before we figured out how to get it to look like we wanted. We finally got a consistent pattern down where we could make each hook look identical. It was a two person job.
Brent did the bending while I held the torch! The metal hooks were definitely the most time consuming part of the project so after we finished shaping the hooks, the rest of the project went super fast. We are really pleased with the finished result. Check out how we made our metal hook towel rack below.
How We Made Our DIY Metal Hook Towel Rack
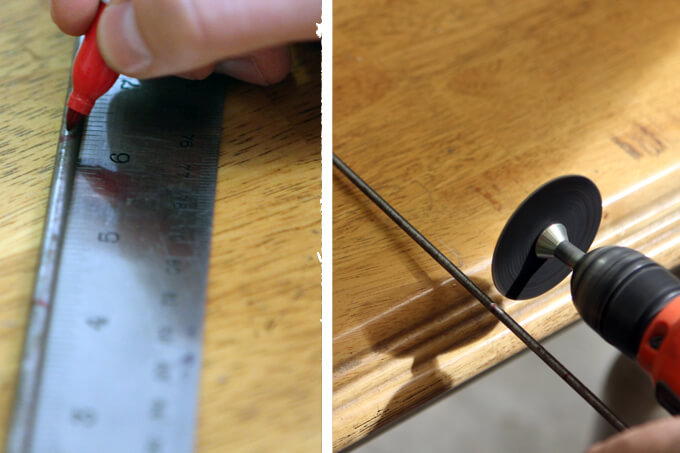
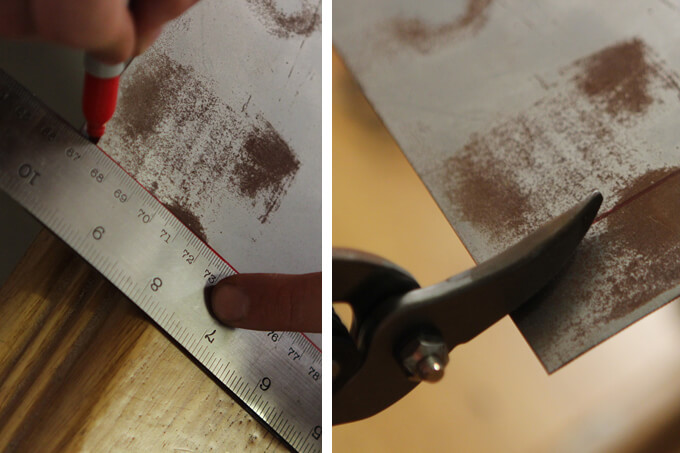
1. We started out by measuring the length of the piece of metal rod we needed for each hook. Then, Brent used a metal cutting attachment for his drill to cut the rod so we had five equal pieces.
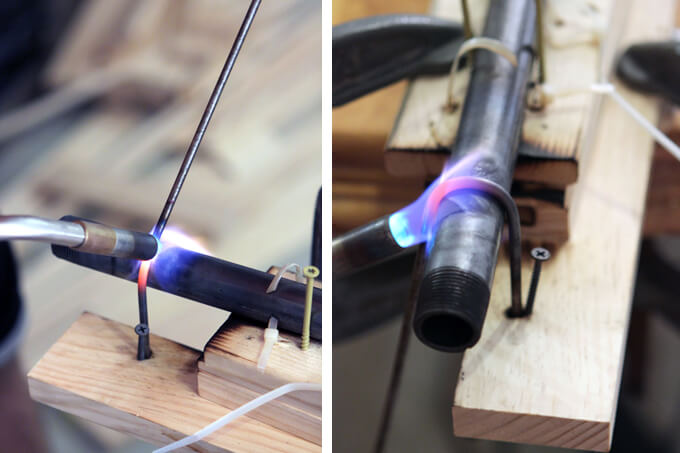
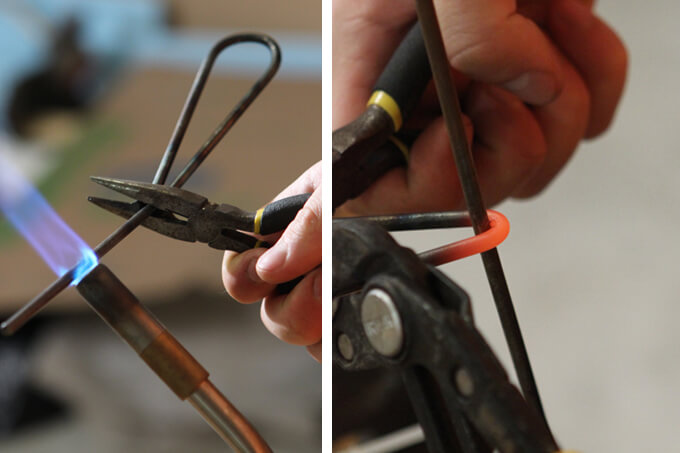
2. To secure the rod before we began bending it, Brent made a jig by drilling a hole in a block of wood and wedged a screw next to the rod to hold it in place. Once it was in place, we used a torch to heat the metal where we intended to bend the rod.
3. When the metal turned orange, we knew it was hot enough to bend. We kept moving the torch around on the rod until we were able to bend it completely around the pipe which formed the first loop.
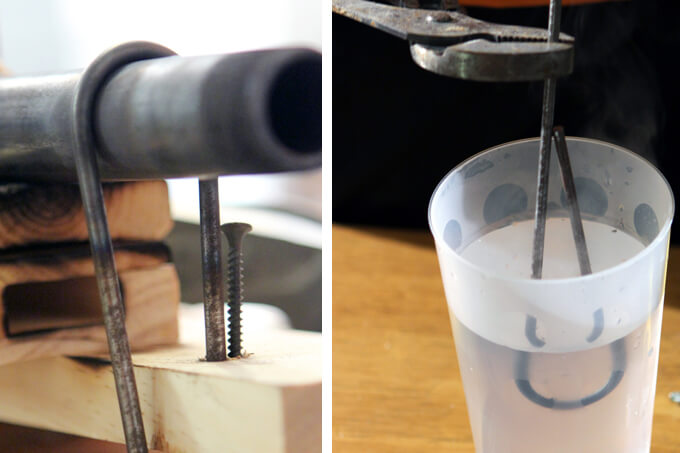
4. Once we got it to be the shape we wanted, we pulled it off the pipe and dunked it water to cool it off. We used pliers the entire time to handle the metal rod to ensure that no unexpected burns took place.
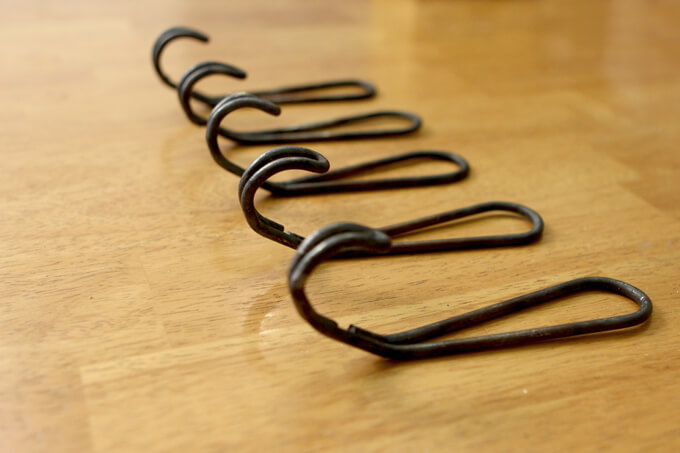
5. Here are what the five hooks looked like after we finished the first loop. We did each section on all five hooks at one time to keep the look consistent. We laid them all out to compare them and made sure they looked even before moving on to the next step.
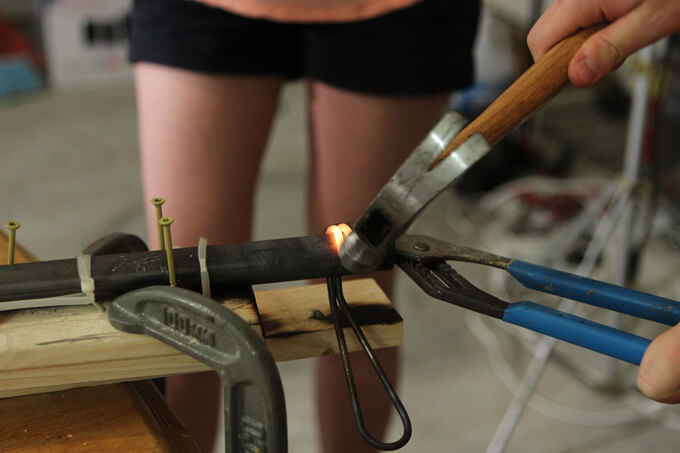
6. We continued the process of heating the metal and bending it to form each loop of the hook.
7. For the final bend, where we turned the top and bottom loops into hooks, I held the torch on the metal as Brent used a hammer to bend it around the pipe. The metal sparked as he hammered it which made us feel like real blacksmiths!
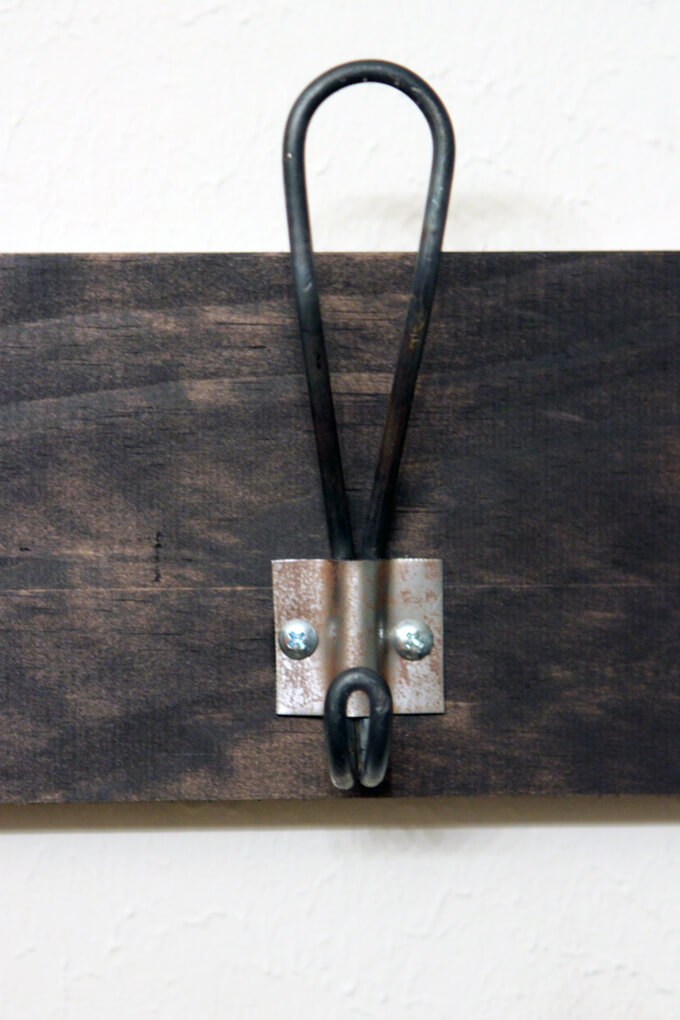
The finished metal hooks.
8. To create the bracket that attaches the hook to the board, Brent used offset snips to cut
thin gauge sheet metal into small squares.
9. To shape the metal squares into the correct form for the bracket, we clamped them between two blocks of wood and bent them by hand.
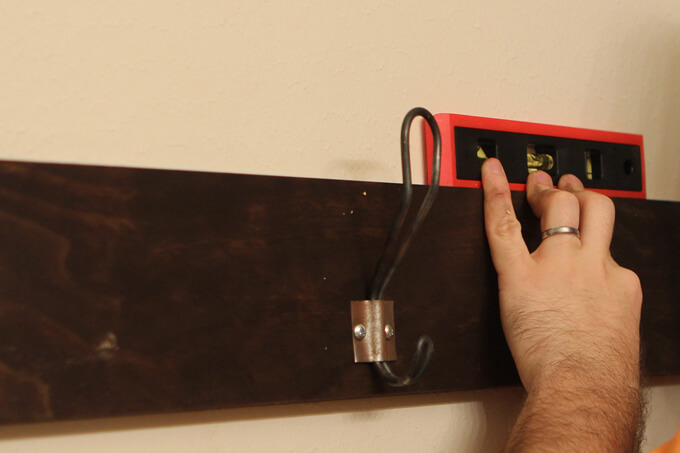
10. We drilled holes on both sides of the metal bracket and then placed the bracket over the metal hook and screwed it to the board.
11. Finally, we screwed the board into the wall. To hide the wall anchors, Brent placed them behind the hook so they would be concealed once the bracket was placed over it. We also cleaned the metal hooks and brackets.
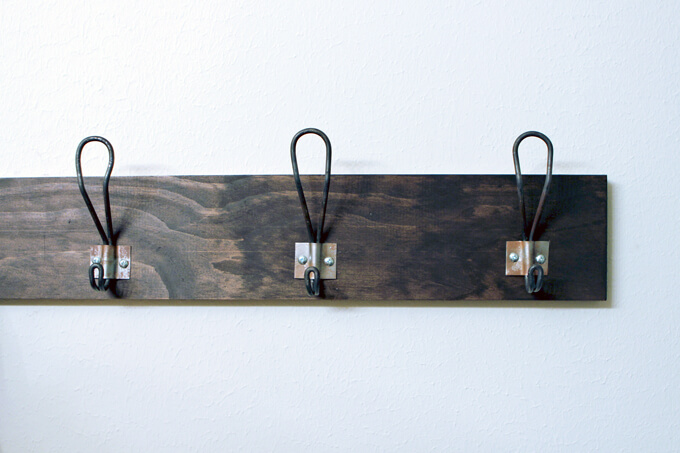
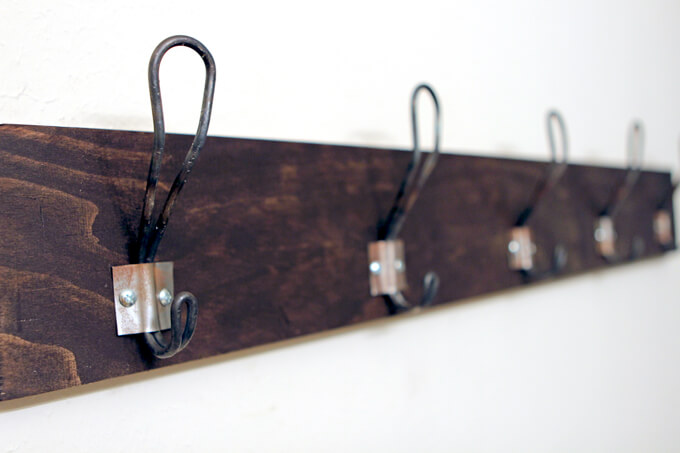
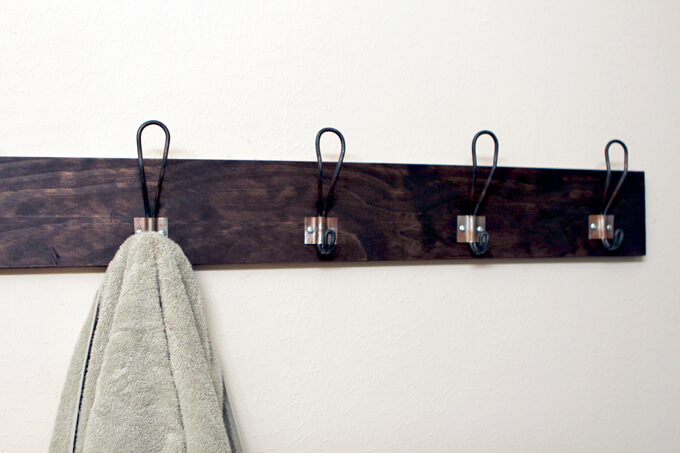
Our finished DIY metal hook towel rack.
Now there are lots of hooks for our guests to hang their towels!
This was our last small project in the guest bathroom and it and the other projects have definitely helped transform this small bathroom into a much more inviting space. I love how all the elements match and flow together. I am really happy with how our guest bathroom is coming along.
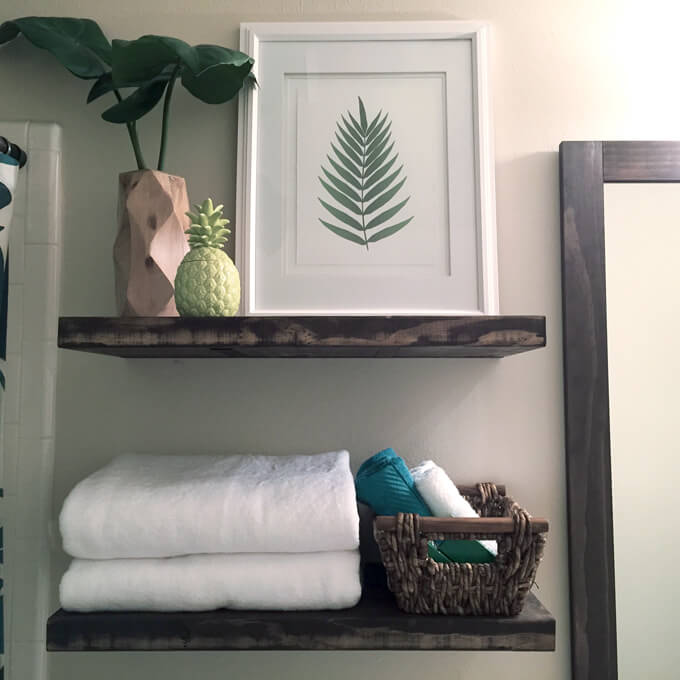
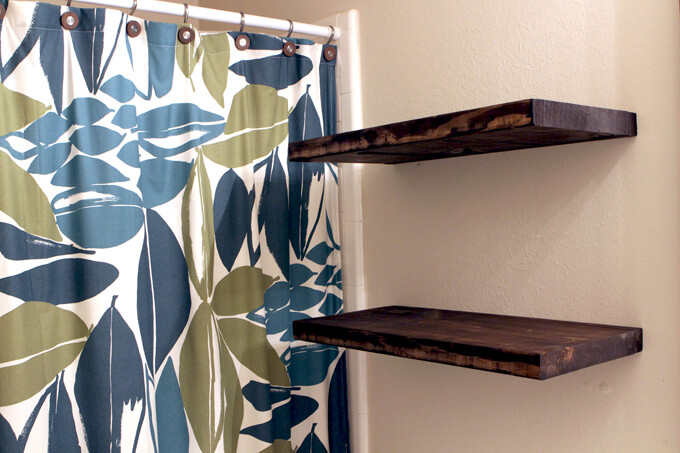
We built a pair of floating shelves to store towels and display decor in our guest bathroom.
Brent and I both took off this past Friday and it made me wish every week could include a three day weekend. It is amazing how much more we are able to both accomplish and relax with an extra day off. We didn’t have anything planned so we worked on checking a few smaller home renovation projects off our list. We managed to get two projects completed, buy supplies for a third project that we will work on today and shopped for new plants for our front flower beds and it is only early Sunday afternoon.
It has been a busy weekend but we were also able to have plenty of down time for dinner and frozen yogurt by the lake with family and enjoying one too many Girl Scout cookies while we lounged on the couch and made our way through several episodes of Bloodline on Netflix. That is one perk of living in the suburbs, it is not difficult in the slightest to get your hands on a box (or two) of Caramel deLites. They basically just show up on your doorstep.
We are excited to have Brent’s parents come visit next weekend and want to get as much of the guest bathroom spruced up as we can before they arrive. Our first project this weekend was to build floating shelves next to the shower. We are really happy with how they turned out and how quickly they came together. Today we are sharing how we built our shelves in a few easy steps.
SUPPLIES
MATERIALS
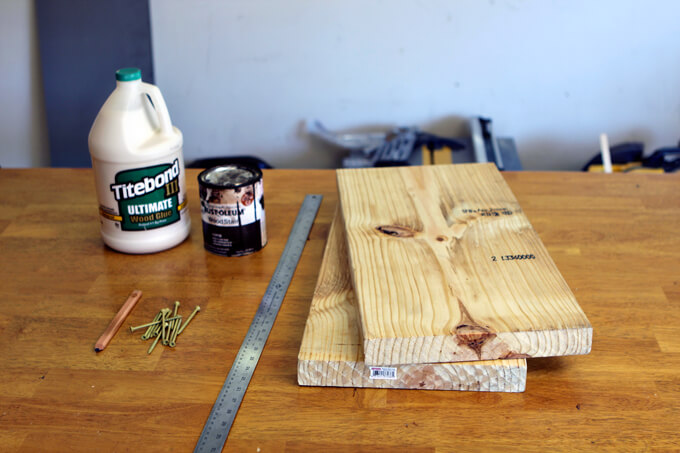
(1) 2″ x 12″ Pine Board
Wood Glue
Wood Stain in Kona
3″ Deck Screws
TOOLS
Table Saw
Ruler
Drill
Clamps
Router
How We Built our Floating Shelves
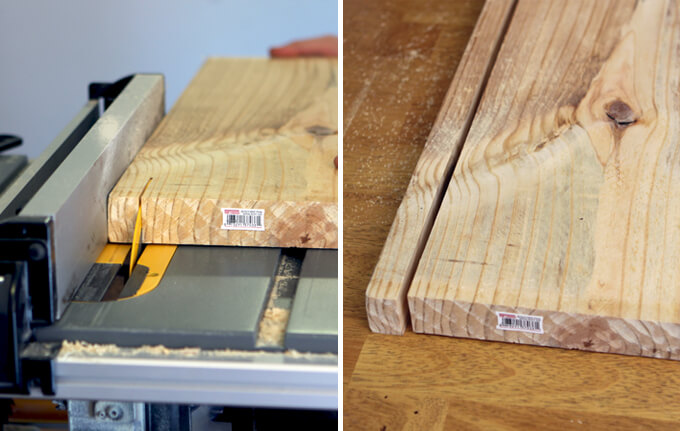
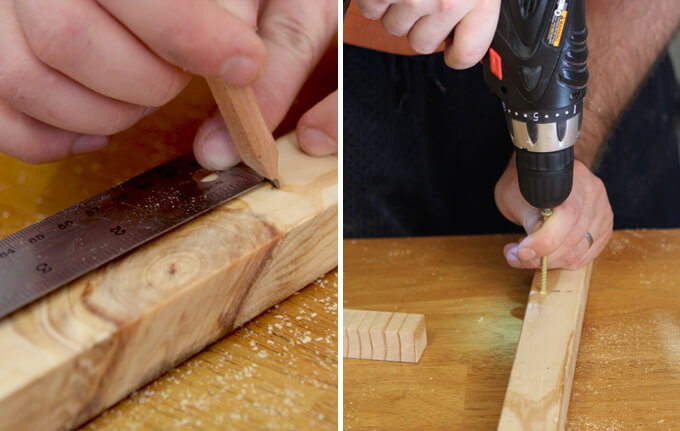
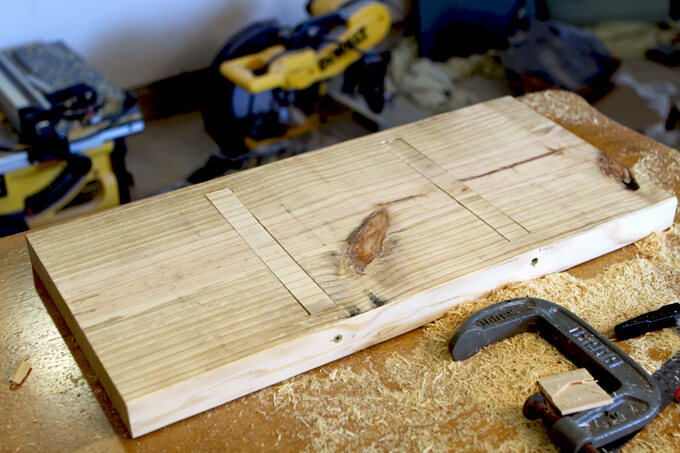
1. The first thing we did was to take our two pieces of pine (that we cut from the 2″ x 12″ to be the correct width for our space) and used a table saw cut off the back inch of the board. This created our bracket piece that we used to anchor the shelf into the wall. By cutting it off the back of the board it matched back up seamlessly with the front of the shelf.
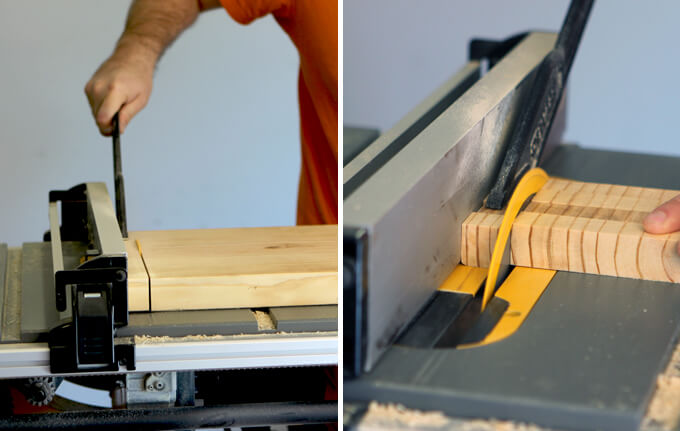
2. For the supports that connect to the bracket anchored into the wall, Brent cut 1″ x 1″ pieces from the left over piece of pine. These boards support the weight of the shelf.
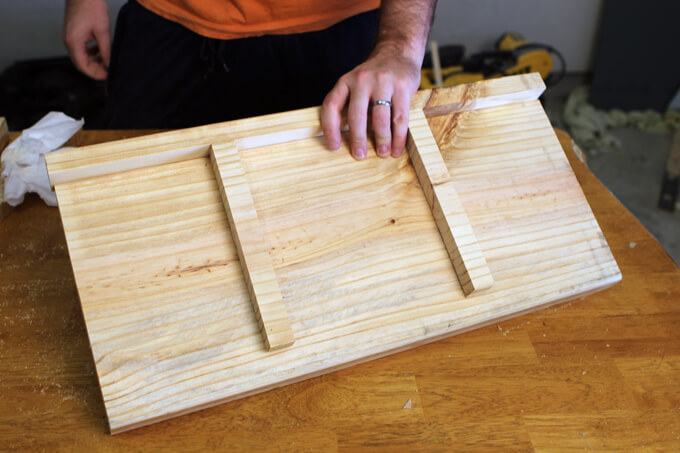
3. Then we laid out the three pieces of the bracket. This is how the completed bracket will look.
4. We used self tapping screws to connect the three pieces of the bracket together. Brent always tries to avoid screwing through any knots because when screwing into knots, that have a tendency to split. We know this from experience.
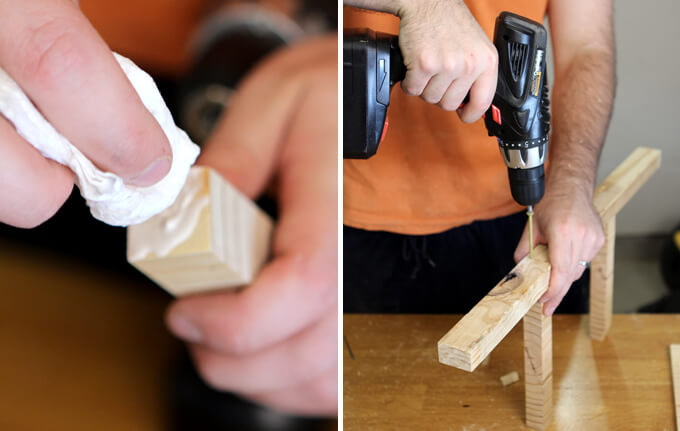
5. We dabbed some wood glue on the end of the two 1″ x 1″ boards that we then screwed into the back piece of the bracket to create strong joints so it would be nice and sturdy once it was assembled.
6. Now that we had our bracket assembled, we needed to remove slots from the bottom of the shelf to created a recessed area where the bracket could fit into the shelf.
7. To determine the area of the shelf that needed to be removed for the brackets, we simply traced the outline of the bracket on the bottom of the shelf.
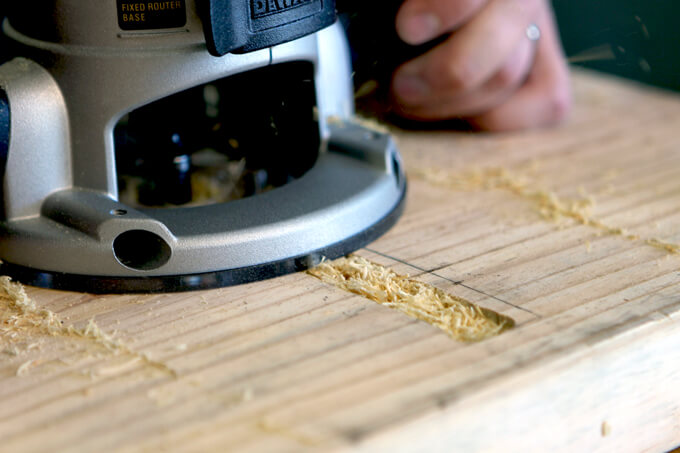
8. We then secured the board to our work space using clamps to make sure it would not move around once Brent started routing the slots. He set his router to be the correct depth and put on all his safety equipment to protect his face while working on this part.
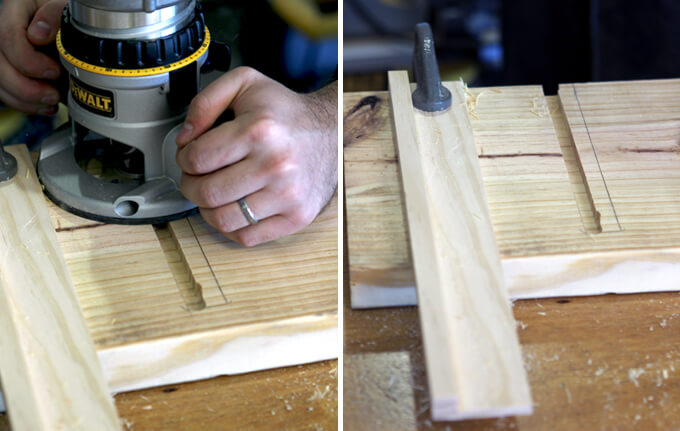
9. To route the slots, Brent used a half inch router bit. It took two passes to get enough of the material removed.
10. To route in a straight line, Brent used a piece of scrap board clamped to the shelf to guide the router. Once the first pass with the router was cut, he moved the scrap board over to guide the router again for the second cut.
11. After Brent finished routing the slots from the bottom of the shelf, he test fit the bracket. It fit perfectly. We always do a happy dance when everything works and fits together correctly the first time. It is a very satisfying feeling.
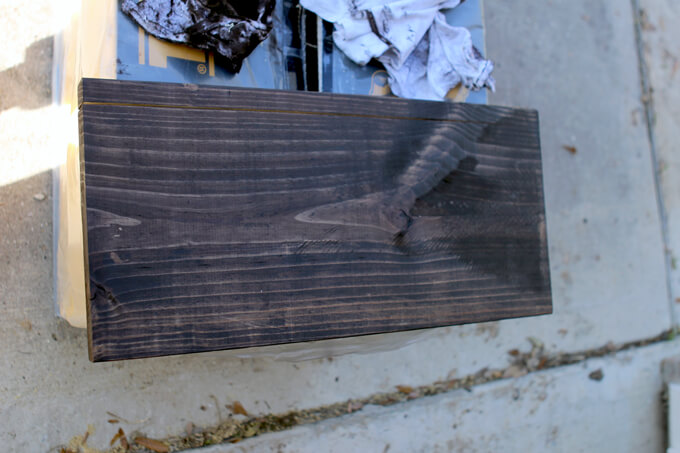
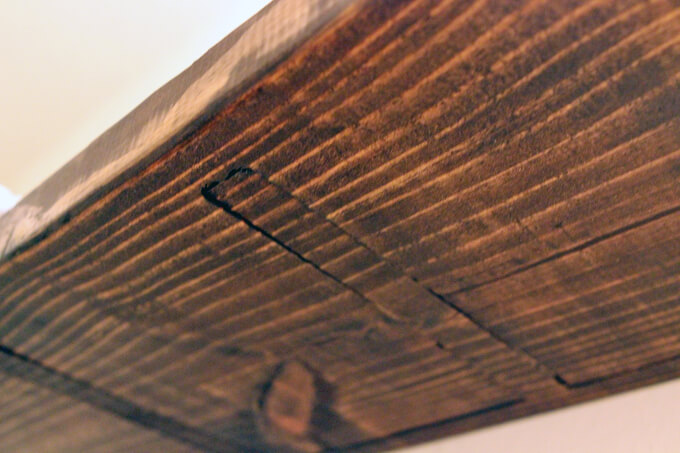
12. We used the same stain on the shelves as we used on the mirrors we framed in the previous project. The great thing about building your own furniture is you can stain everything to match.
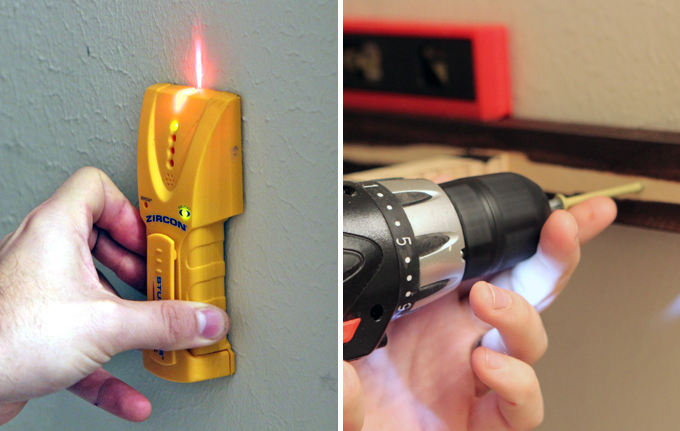
13. After marking the studs with a stud finder, we secured the bracket to the wall with 3″ deck screws.
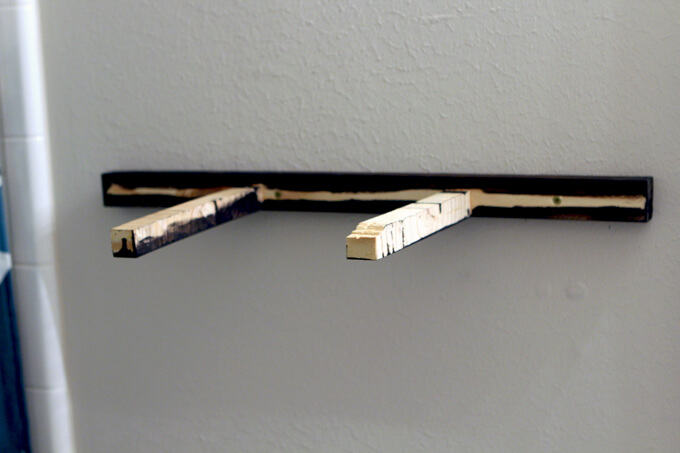
14. The bracket isn’t much to look at by itself but it is secure and will support the shelf which is all that really matters.
15. This is a view of what the bottom of the shelf looks like after it is attached to the bracket. We thought about trying to conceal the bracket but we like how it makes for a nice design element on the bottom of the shelf, if you happen to look under the bottom of the shelf.
This is what the floating shelves looked like once they were both up on the wall.
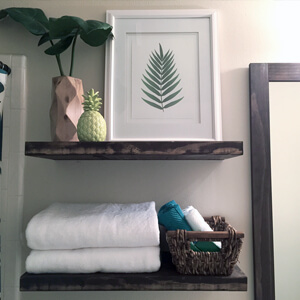
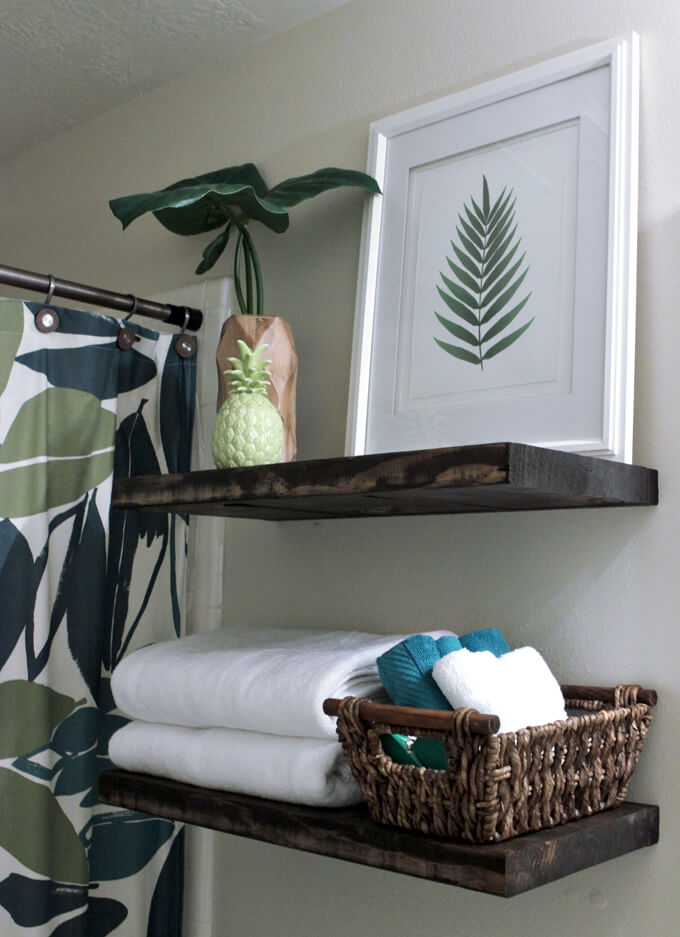
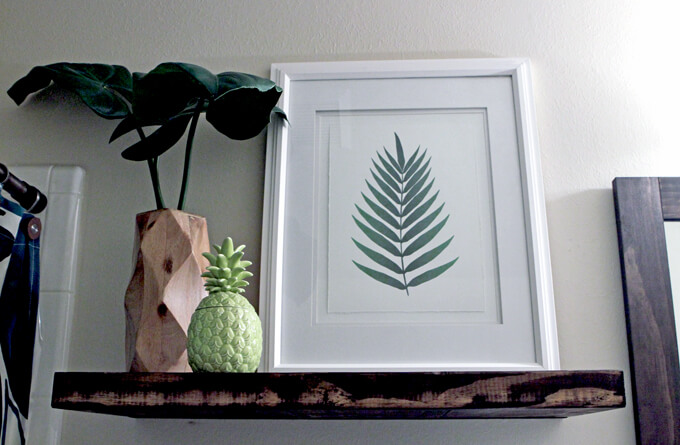
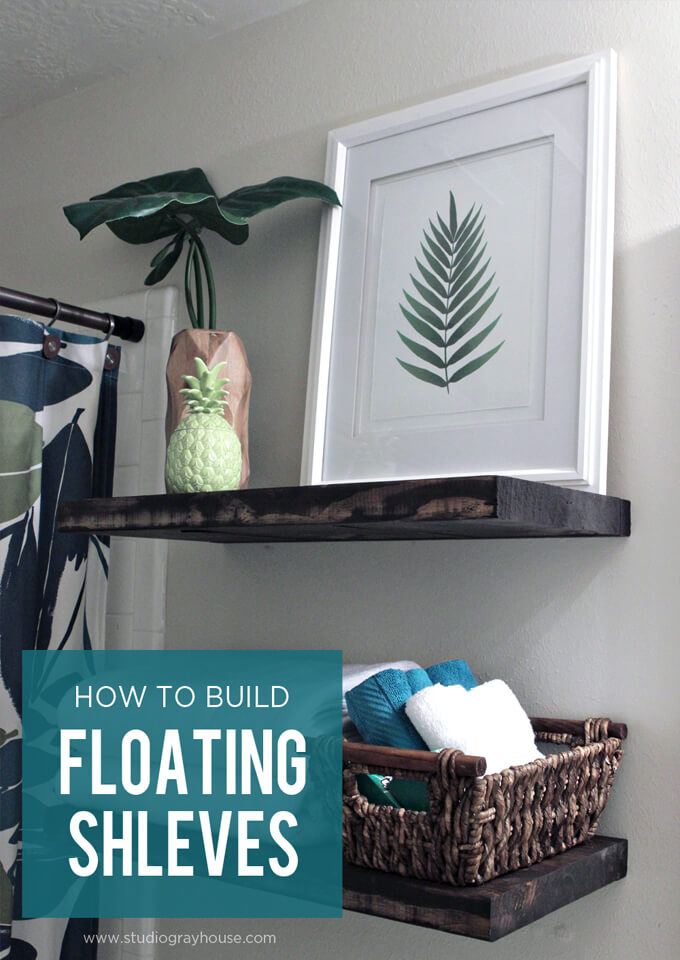
I styled the floating shelves with a few simple tropical elements to tie in with the shower curtain and some bathroom necessities so they are nice and handy for guests.
I love how the framed print turned out on this shelf. We purchased the digital version of this leaf print and then Brent tapped into his past experience with printmaking to help take it up a level. He tore the edges of some nice paper he had left over from when he worked on letterpress prints and ran it through the ink jet printer.
Then he mounted that on another piece of his nice paper and we put a matte around it and framed it with this large white frame I had but could never find anything to put in it. The torn edges and three dimensional feel help give it more of a fine art print appearance and allowed us to scale it larger while still only using our home printer. Check out our tutorial on framing prints to see in more detail how we did this.
Here is the progress in this room. It is such a small and narrow room that it is very tricky to photograph the whole thing to show all the changes we have made so far. We will just share each section we work on until the entire room is complete.
Adding floating shelves, framing our mirrors and putting up a bronze shower curtain rod has already transformed this room into a much more welcoming space. Our next project is to build a new towel rack!
FYI: This post contains a few affiliate links to products we used to make this project. Gray House Studio does receive commissions for sales from these links but at no extra cost to you. We appreciate you supporting this site. Read our privacy and disclosure policy.
Our DIY concrete planter template includes the outer mold template and the inner mold template for $3. We appreciate your support!
STEP BY STEP GUIDE
How to Build the Outside Mold
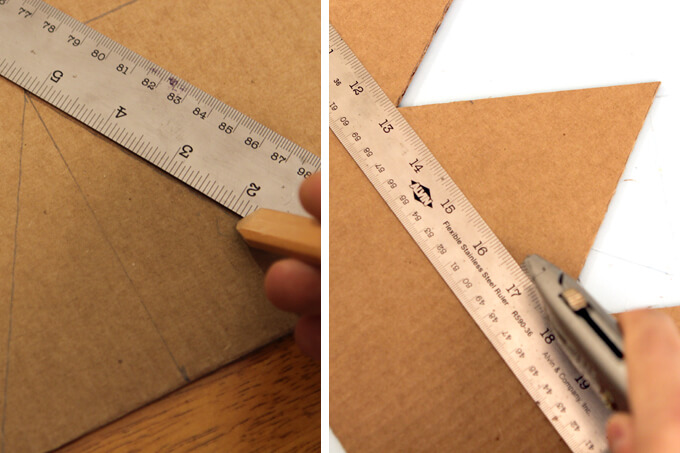
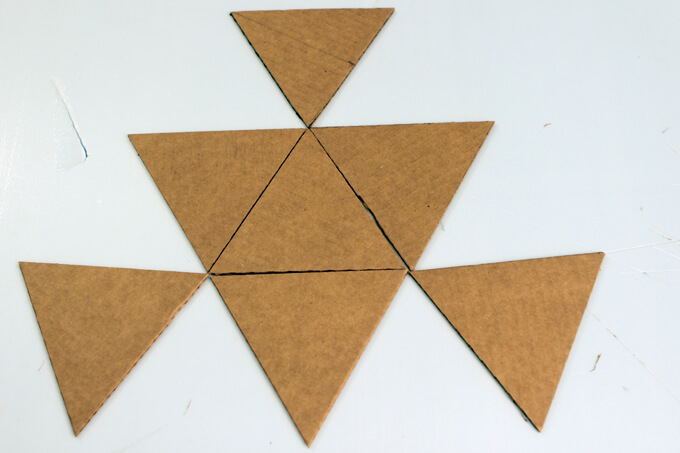
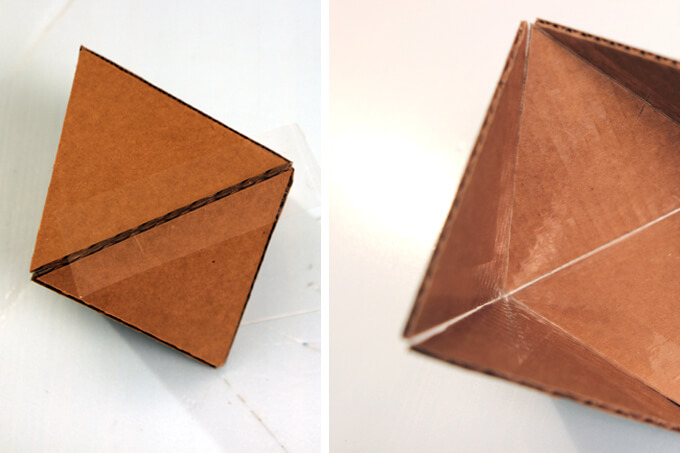
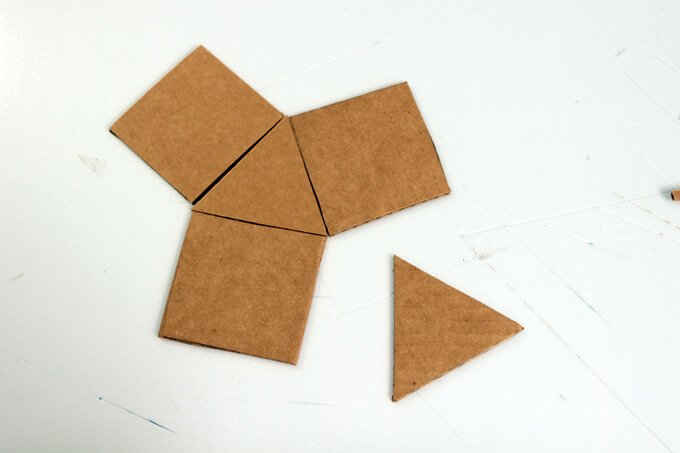
1. The first thing I did was use my ruler to measure and trace seven triangles on cardboard and then cut out each individual cardboard triangle with the box cutter.
2. I cut out seven triangles of equal size and then arranged them into the pattern above.
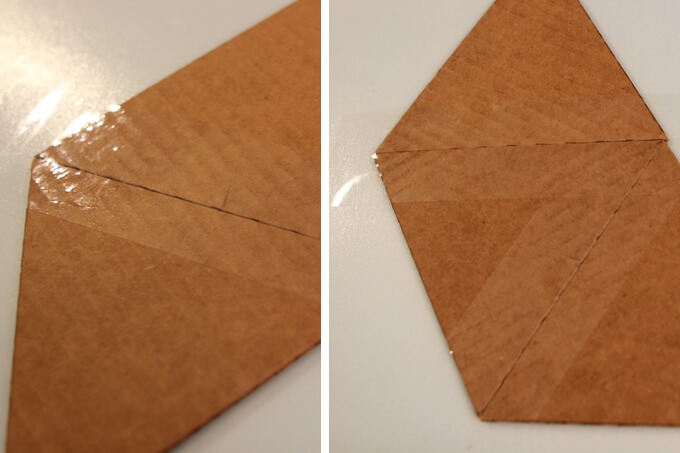
3. Next, I used clear packaging tape to connect the inside seams of the triangles together.
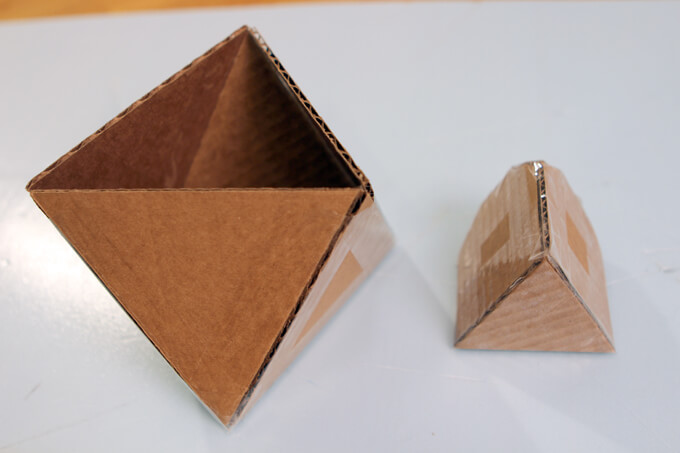
4. Once the box was taped on the inside and assembled into the three dimensional form, I added tape to the outside to strengthen the mold.
How to Build the Inside Mold
5. To create the inside mold, I cut out two more triangles and three squares.
6. I assembled these pieces and covered all the seams in tape to create the three dimensional form.
How to Mix the Concrete
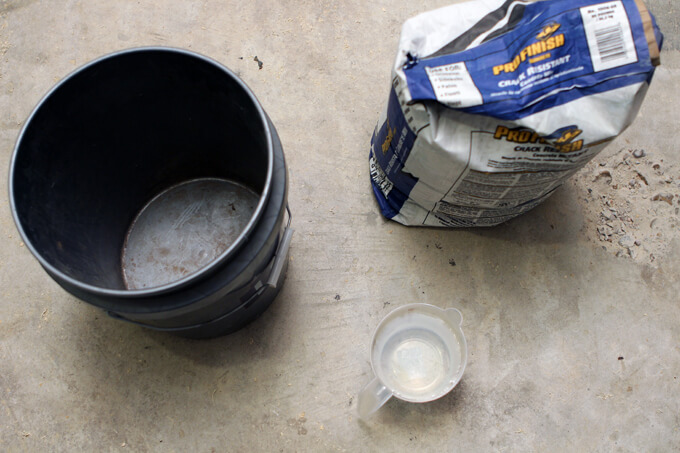
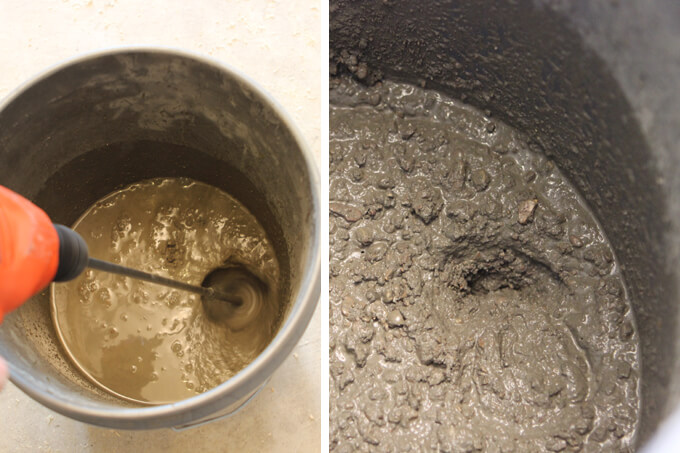
7. First, I prepped my materials which included the bucket, water and the concrete mix I made sure to have twice as much water than needed on hand.
8. Then I poured the water into the bucket and mixed in the concrete mix with the mixer attached to a drill.
I continue to add the dry concrete mix into the bucket until the mixture was thick and evenly mixed with the water.
To test for the right consistency, I dug a little hole in the mixture. When the mixture didn’t fill in the gap, I knew it was ready to use.
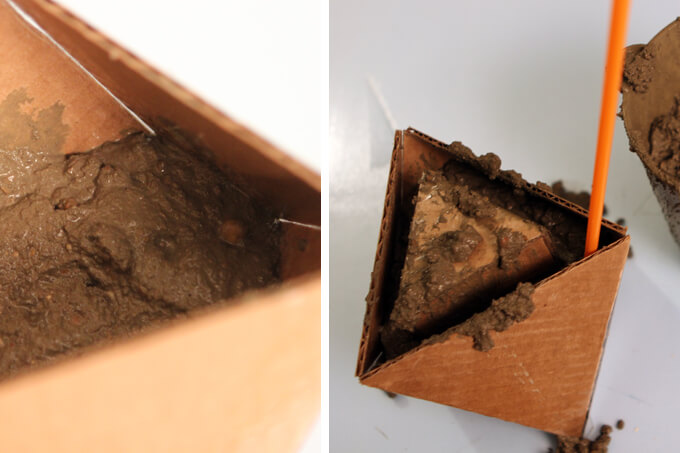
9. Once the concrete mixture was ready, I filled the bottom of the outer mold. Then I placed the inner mold into the outer mold.
The inner mold acts as a plug and creates the hole in the planter for the plant.
10. When you mix concrete it traps air bubbles inside of it so after I poured the concrete into the mold I used an electric sander to vibrate the concrete forcing the air bubbles out which gave me a smooth finish.
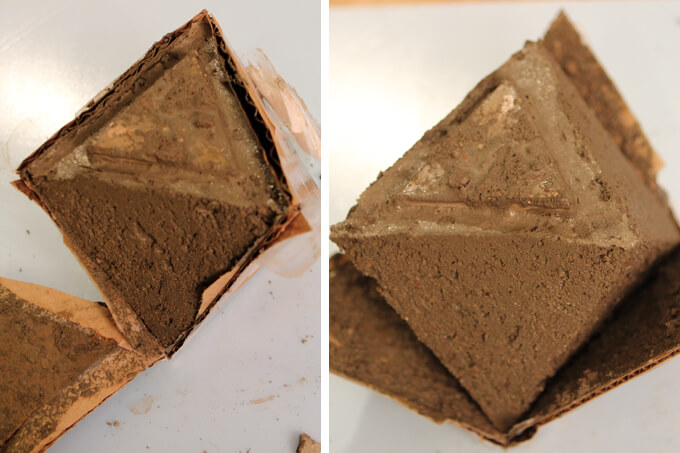
11. I let the concrete sit in the mold for several hours and then I removed it from the cardboard.
I found that depending how long you leave the concrete in the mold, you get different textures on the concrete which I like because it makes each planter unique.
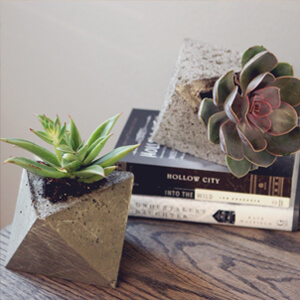
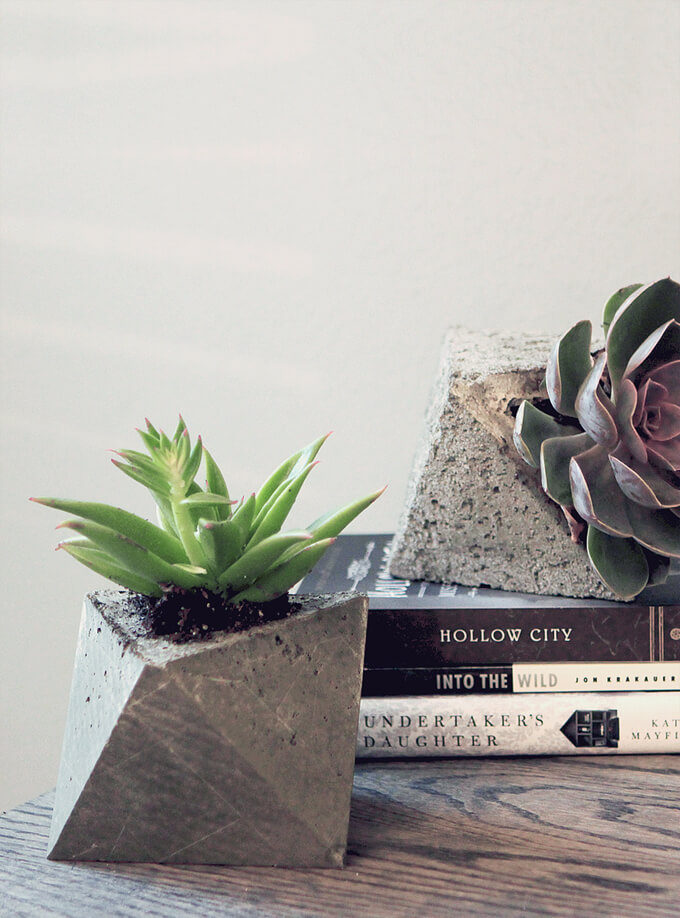
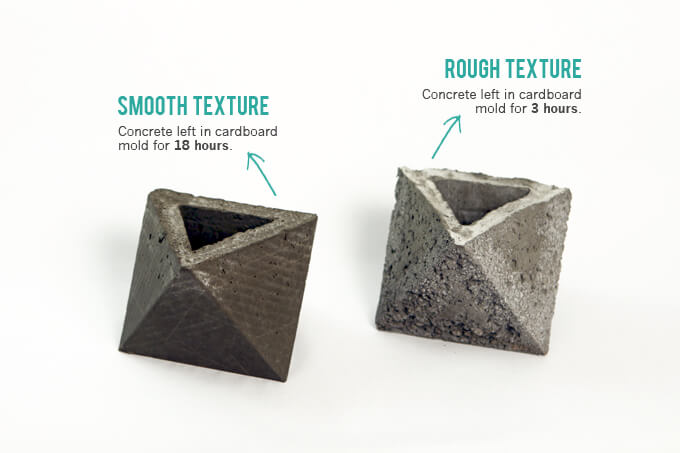
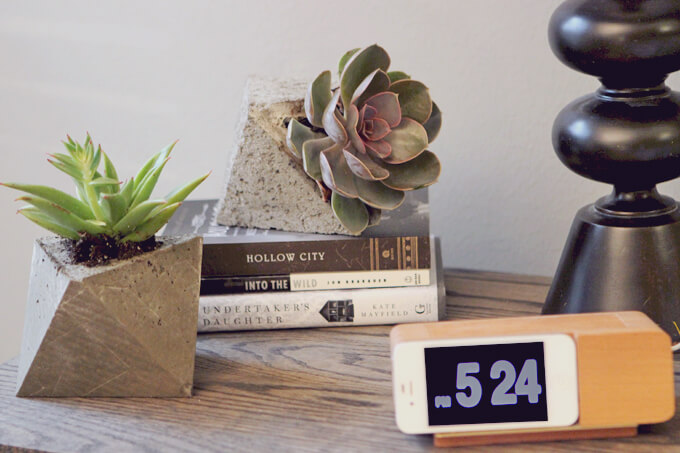
12. You can see the difference in the photo above. For the planter on the left I let the concrete dry in the mold for approximately 18 hours which gave me a smoother texture.
The planter on the right was the first one I made and I only let it dry in the mold for around 3 hours which gave me a rough cinderblock like texture.
I planted succulents in them and placed them on the nightstand in our bedroom. These were so easy, inexpensive and fun to make that I am sure I will be making many more to add throughout the house.